# Protocols
### **What is email authentication?**
The role of email authentication is to confirm that you, the sender, are who you say you are. This makes it much harder for spoofers and spammers to impersonate you.
Simple Mail Transfer Protocol (SMTP) doesn’t have any in-built authentication protocols to prevent this from happening, which is why implementing separate measures is necessary.
Authentication also improves your [email deliverability](https://mailtrap.io/blog/email-deliverability/) and sender reputation by providing ISPs with the assurance that they are indeed dealing with you, and only you (not that “J0hn from M1cr0s0ft” guy who urgently needs you to update your credit card).
When an email is processed by the incoming server set up for your recipient, the results (success or failure) of your authentication efforts are received. With this information, the server can then determine if the message should be delivered to an inbox, sent directly to a spam folder, or discarded from the server.
If your emails are not authenticated at all, there’s a good chance your message will be considered spam by [spam filters](https://mailtrap.io/blog/spam-filters/) or get rejected. The same may happen if you’ve set up one or more authentication standards, but any of them fails.
For this reason, quickly setting up a single authentication method can cause more harm than good. The best thing you can do is set up multiple methods, and regularly monitor how they affect your emails.
### What are the available email authentication protocols?
Several methods exist that focus on different aspects of email messages.
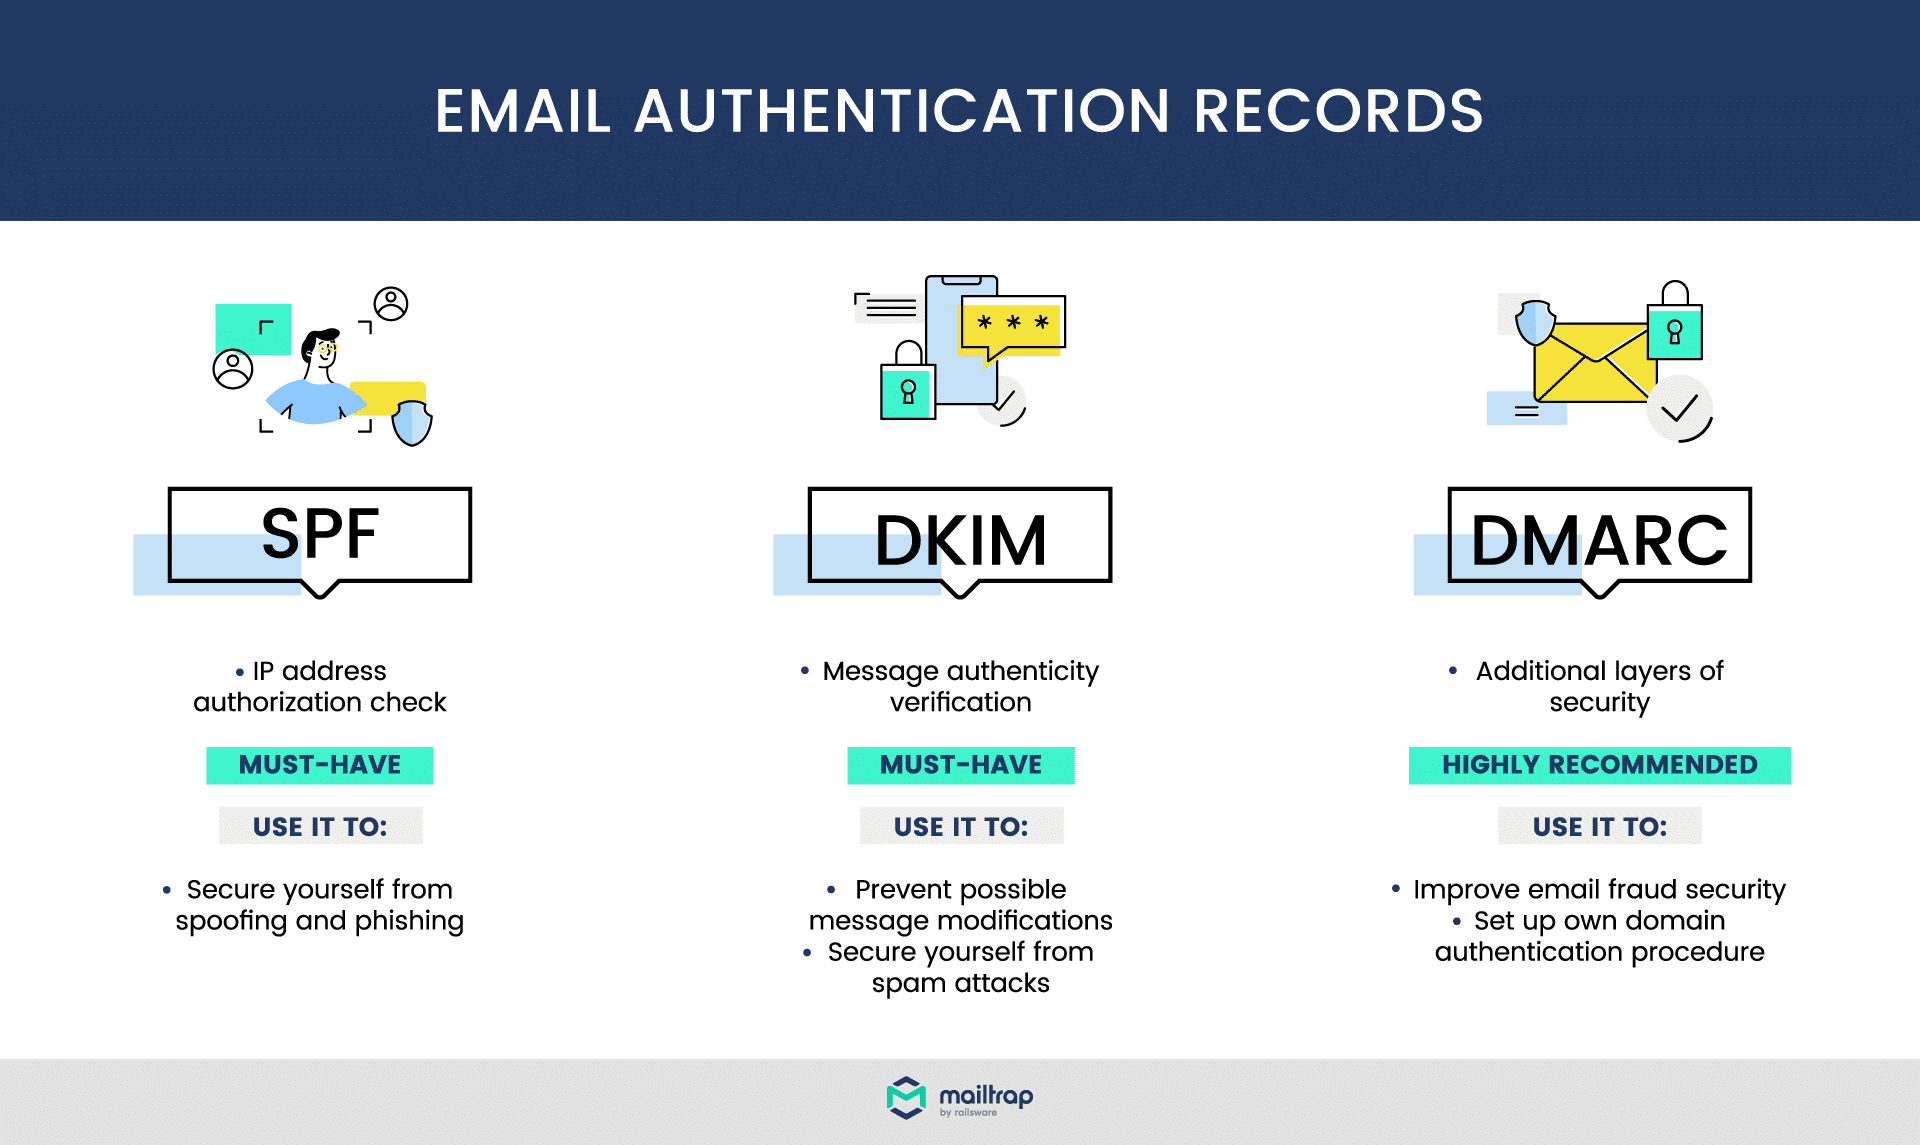
Two of the most commonly used methods are **SPF** and **DKIM**. SPF is a form of email sender authentication. It validates if an email was sent from an authorized IP address. DKIM, on the other hand, is a form of domain authentication. It checks that an email arrives with exactly the same content that was sent.
Then there’s **DMARC**, the most sophisticated of these. It runs SPF and/or DKIM checks, and then performs an additional alignment check (more on this later). Additionally, the email sender can instruct the recipient on how to treat messages that fail this test.
There’s also a **Reverse DNS** lookup. This is not, strictly speaking, an authentication protocol, but is also a vital way of validating a sender. If a [PTR record](https://www.cloudns.net/wiki/article/40) is set up by a domain owner, an email server can resolve an incoming IP address to validate if that domain is authorized to send emails.
And finally, there’s a new kid on the block, **BIMI** **Record**. BIMI’s pilot versions have already rolled out, but there’s still a long way to go before widespread adoption. Once that’s done, it will give corporate brands a way to authenticate their emails visually; more on this a bit later.
Let’s go over each of these methods in more detail.
#### Sender Policy Framework (SPF)
SPF is a record that belongs to the domain’s DNS (Domain Name System). It is a simple TXT file (previously used SPF has been deprecated). In this file, domain owners specify the list of IP addresses (mail servers) that are authorized to send emails from a given domain.
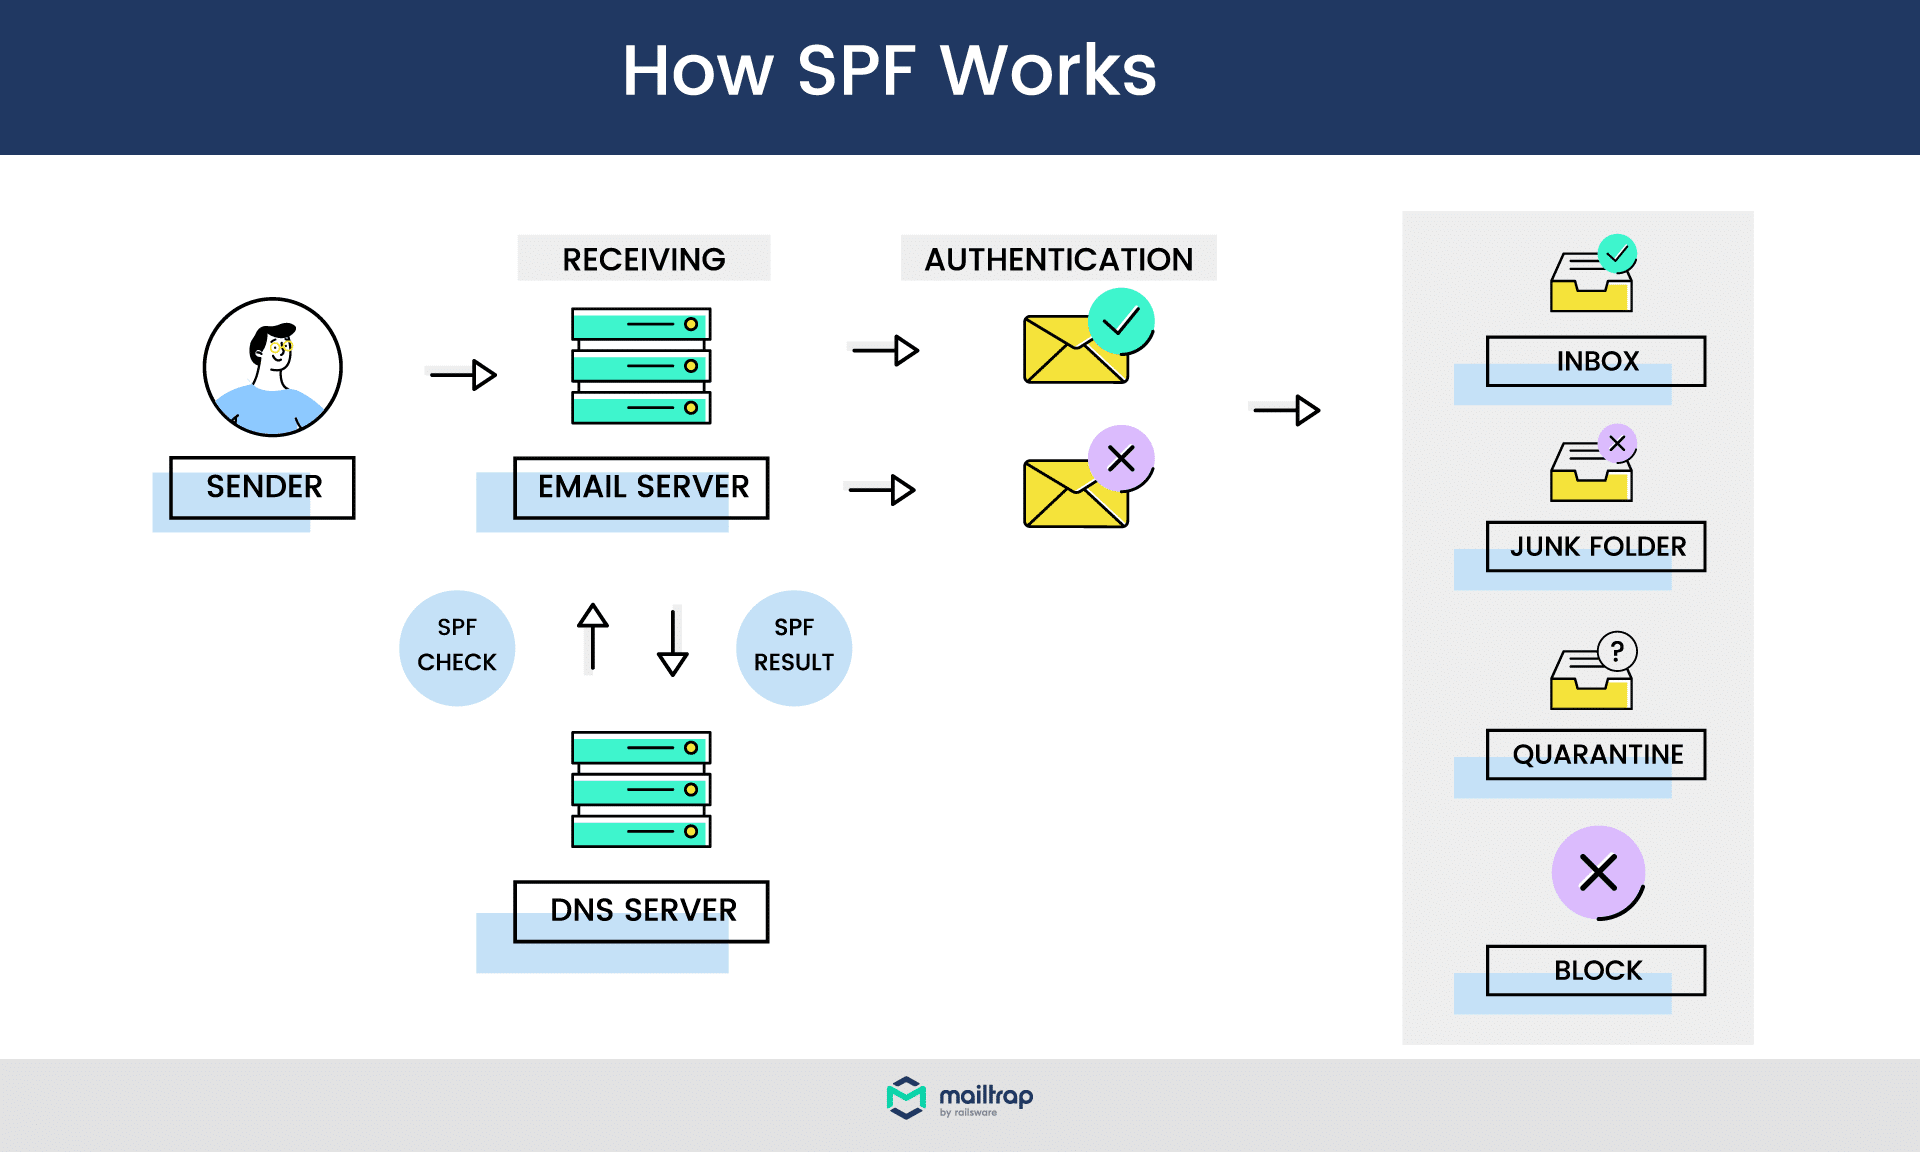
When an email arrives at a server that processes incoming mail on behalf of a recipient, a quick check is performed.
A receiving server runs a DNS lookup of an “envelope sender address” (aka “return-path address”). When it finds an SPF record, it scans the list of authorized addresses for the record. If there’s a match, the result of an SPF test is positive.
In any other case, the check is negative; in this case, a “SoftFail” will be triggered. This means that the server should still accept the email, but will mark the SPF check as failed, which serves as a reason for an email to be discarded.
Because of its wide adoption, SPF is considered to be a must-have for all regular email senders. Having SPF authentication immediately increases the chances of valid [email delivery](https://mailtrap.io/blog/email-deliverability/). If you’re unsure if you have SPF set up or if it’s up to date, you can quickly check via easily available email authentication tools (for example, those from [MX Toolbox](https://mxtoolbox.com/spf.aspx)).
**Example of an SPF record**
Now, let’s stop theorizing and see what an actual record looks like. If you were to look up our domain, you would find the following record:
```
v=spf1 include:_spf.google.com include:sendgrid.net include:_spf.reply.io include:helpscoutemail.com include:_spf.smtp.mailtrap.live ~all
```
Let’s examine this step by step:
* *v=spf1* -> The beginning refers to the version of SPF in use. In almost every case, it’s simply “spf1’” – version 1, also known as SPF Classic.
* *include:* -> Here, we specified which domains we use to send emails from the mailtrap.io domain. As you can see, we use Mailtrap.live, SendGrid, Reply.io, as well as Google (Google Apps to be specific). Optionally, an additional parameter can be added before “include”, but does not change anything here.
* *\~all* -> Finally, this specifies that all other domains are not authorized to send on our behalf. ‘\~’ in this case means a SoftFail recommendation.
Instead of server names, you can also use IP addresses in both ip4 and ip6 formats. Here’s the example for SendGrid:
```
v=spf1 ip4:167.89.0.0/17 ip4:208.117.48.0/20 ip4:50.31.32.0/19 ip4:198.37.144.0/20 ip4:198.21.0.0/21 ip4:192.254.112.0/20 ip4:168.245.0.0/17 ip4:149.72.0.0/16 ip4:159.183.0.0/16 include:ab.sendgrid.net ~all
```
There are several optional parameters that may be useful if you want your records to be more (or less) strict. For more about this, please check our article on [SPF Records](https://mailtrap.io/blog/spf-records-explained/), where we also address common misconceptions, SPF setup, and validation instructions.
**How to use SPF correctly**
SPF comes with several qualifiers that give an email server information about how to treat IPs/hosts outlined in an SPF record. The available qualifiers are:
* *\~* -> **SoftFail** – accept emails but mark SPF as failed
* *–* -> **Reject** – reject emails
* *+* -> **Pass** – allow emails (if no qualifier is used, + is assumed)
* *?* -> **Neutral** – no policy (results of a check are not marked)
Note that these are just suggestions given to a server; they can be ignored. An IP with a “Pass” policy may be rejected or sent to spam, while a ‘Reject’ policy may not stop an email from finding its way to an inbox.
In the example above, you can see that we chose an “\~all” policy. This means that IPs failing a test still have a chance to be accepted, but will be marked as “SPF failed”. This more relaxed approach is recommended for most email senders and makes for a good balance between security and deliverability. The “Neutral” approach is also frequently used.
If we were to choose an “-all” policy, we’d suggest rejecting all emails that don’t meet the earlier criteria. This approach is generally recommended only for the most secure domains, as it can lead to legitimate emails getting discarded.
Remember that when you use DMARC along with SPF, your SPF policy will not apply.
#### DomainKeys Identified Mail (DKIM)
DKIM is another must-have authentication. It’s a digital signature that’s attached to an email, encoded at the moment of sending, and validated when an email is about to arrive at a recipient. When DKIM is configured, a public key is generated and added to the sending domain’s DNS along with the DKIM record.
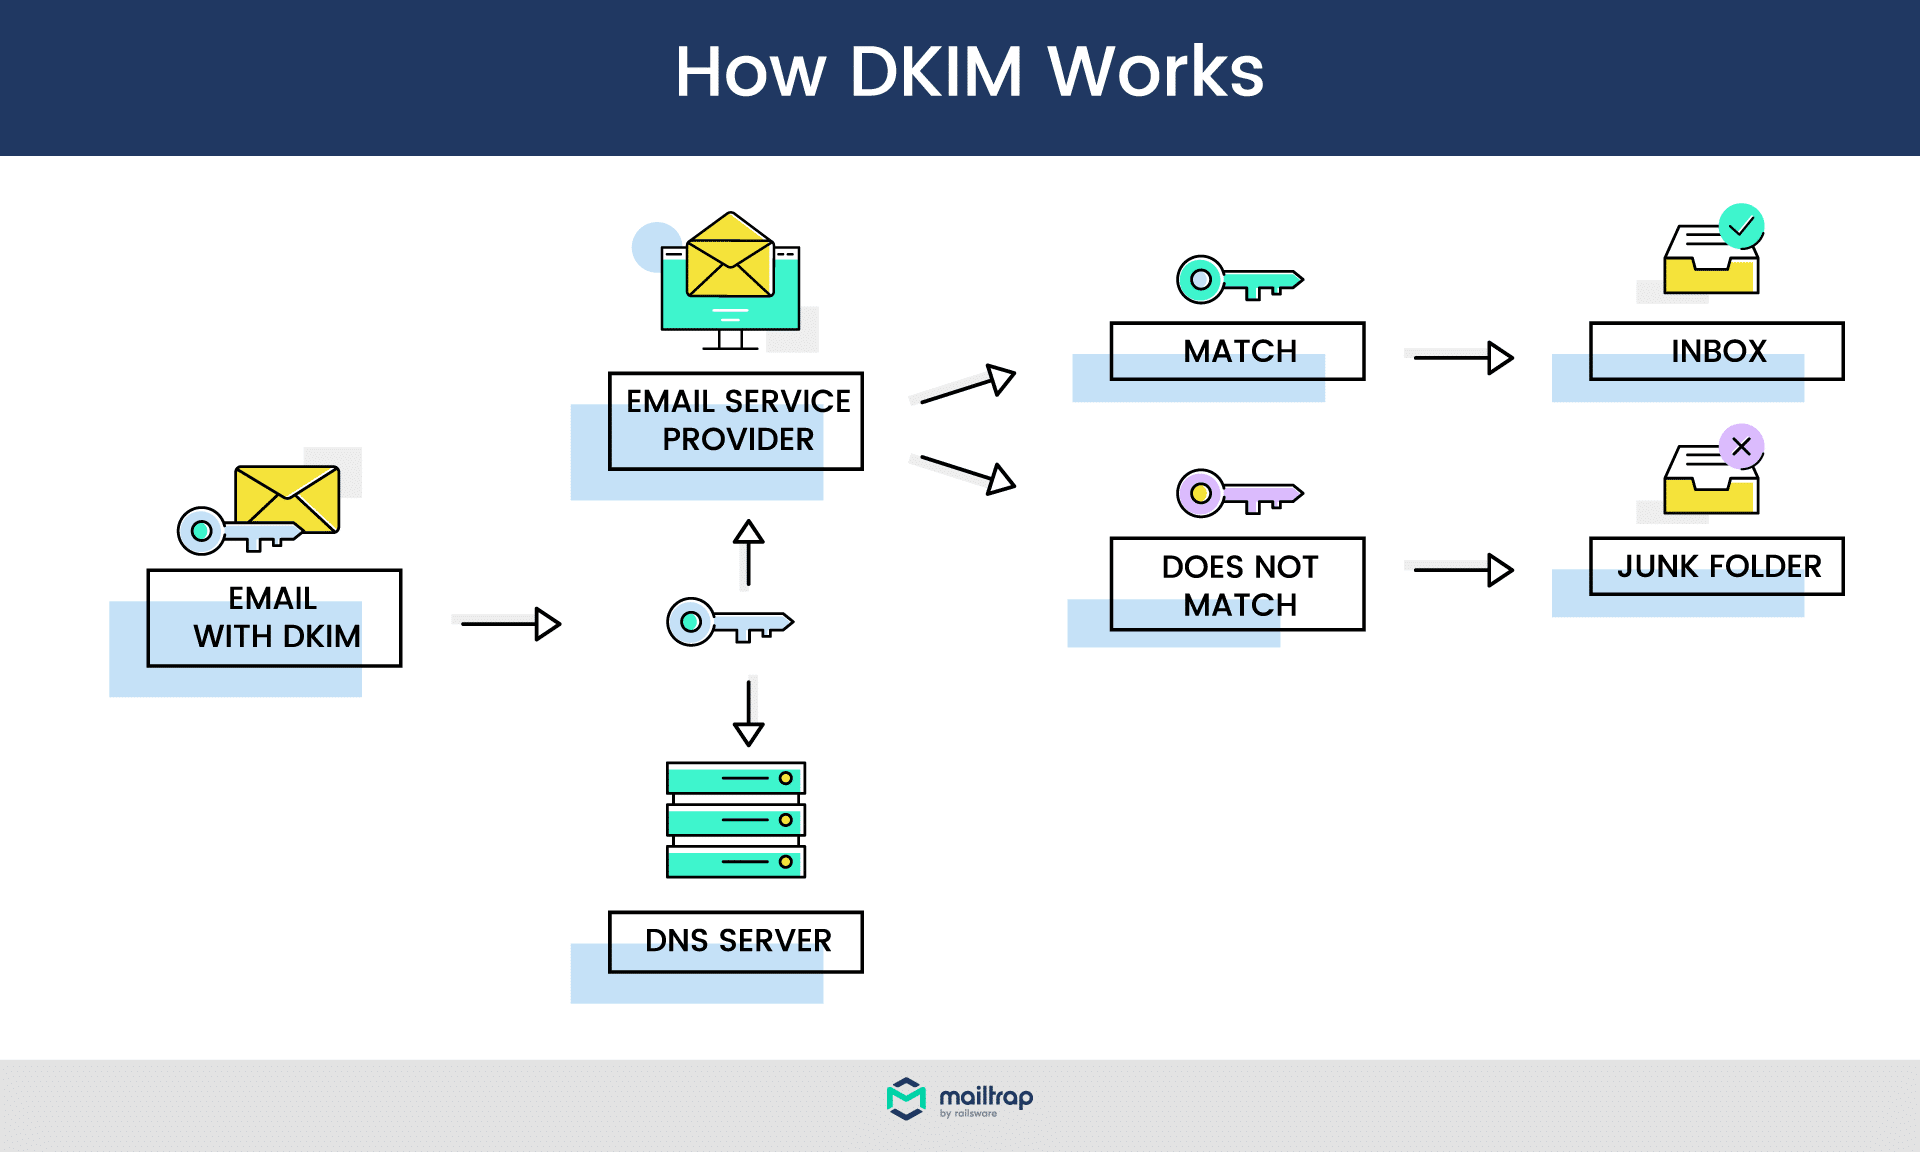
When an email is created and sent through an email service provider, a DKIM signature is created. It contains hashed details such as [email headers](https://mailtrap.io/blog/email-headers/) and a body, encrypted with an individual, private key.
When an email arrives, a server retrieves a public key from the sender’s DNS. With this DKIM key, it can recreate the hashes for the received message, and compare them against the ones it received. If they match, the test is passed. If a message was modified on the way (for example, its body has been changed), the DKIM authentication would fail, and the message is likely to be discarded.
**Example of a DKIM Record**
AA typical DKIM looks a bit more complex than SPF. Let’s look at an example:
```
DKIM-Signature: v=1; a=rsa-sha256; d=example.net; s=newyork;
c=relaxed/simple; q=dns/txt; t=1117574938; x=1118006938;
h=from:to:subject:date:keywords:keywords;
bh=MTIzNDU2Nzg5MDEyMzQ1Njc4OTAxMjM0NTY3ODkwMTI=;
b=dzdVyOfAKCdLXdJOc9G2q8LoXSlEniSbav+yuU4zGeeruD00lszZ
VoG4ZHRNiYzR
```
It features several tags, the most important being:
* *s=* -> selector, which is a label associated with a given domain’s DNS. A domain can have multiple selectors, letting its owner create multiple DKIM records for different purposes (e.g., one for sales email, another for newsletters, etc.).
* *bh=* -> hashed message body.
* *b=* -> the digital signature in a hashed format.
There are several other mandatory and optional tags you can use in DKIM. Please check our dedicated [DKIM](https://mailtrap.io/blog/dkim/) article for a detailed overview of DKIM records, and instructions on how to authenticate email domains with DKIM and test the setup.
**Good practices for using DKIM**
DKIM offers no mechanics for telling a server how to treat failed attempts; it focuses on just one aspect of [phishing scam prevention](https://mackeeper.com/blog/what-is-phishing/). Because of that, it’s highly recommended to combine DKIM with SPF whenever possible. This way, you can verify where the message originates from, and if it has been modified in the process.
A good practice is to also update your private and public keys regularly (once or twice a year is perfectly fine). It’s also a good idea to have a few available selectors, and change keys one at a time. Why?
When keys change, some emails may still be processed, and their DKIM tests will fail. To prevent this from happening, you can add two signatures to an email with two different selectors. When keys change for one, the second will remain unchanged, and DKIM tests will most likely pass.
#### Domain-based Message Authentication Reporting and Conformance (DMARC)
DMARC is not an authentication method, strictly speaking. It builds on SPF and DKIM and adds another level of security, known as domain alignment. DMARC also allows you to set up a policy for failed checks and can help generate email performance reports. All of these features combined make it the most reliable measure you can take against spoofing.
DMARC requires either SPF or DKIM to be present, but the best practice is to have both in place. This way, your emails are more secure, and DMARC operates at its full strength.
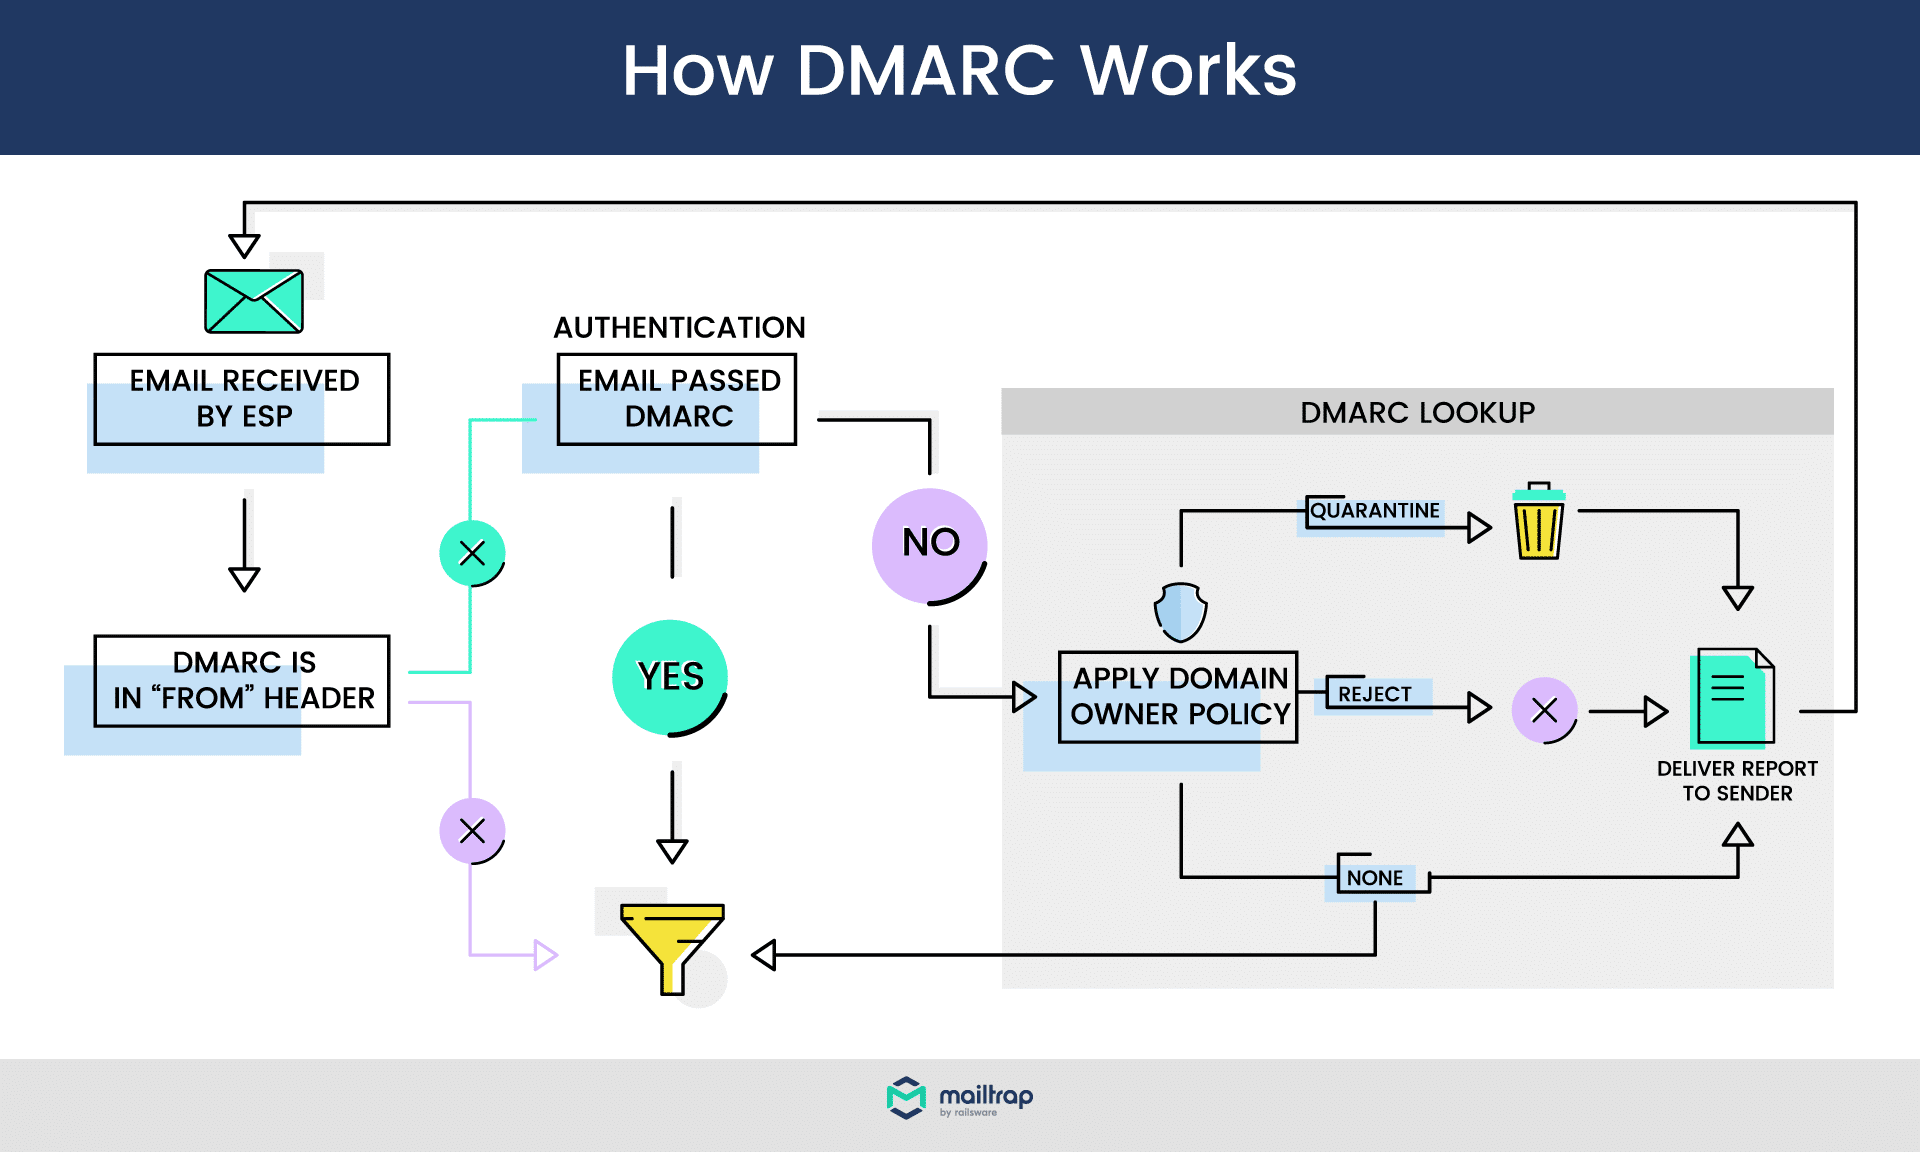
When a DMARC-aligned email arrives, at first, it’s business as usual. SPF and/or DKIM checks are performed. Then, a **domain alignment** is performed. The server checks if:
* SPF: the “envelope from” email address matches the “return-path” address. In other words, it checks if the sender’s email address is the same as the address a potential reply would go to.
* DKIM: the value of the ‘d’ tag (sender’s domain) matches the sender’s domain.
Domain alignment can be set to either “relaxed” or “strict”. Picking the right option is particularly important for those who use external services (ESPs) to send emails.
For example, if you forget your Mailtrap password and wish to reset it, you’ll receive an email from . At the same time, the return-path address for this email would be something like “bounces+8208408-cfe8-user=”.
If you were to set the “strict” SPF alignment, DMARC would fail, as the domains of both addresses are different. If you chose the “relaxed” setting, the alignment test would succeed.
With DMARC, you can also provide guidance to the recipient’s email server on how it should handle failed tests. You can pick from the following three policies:
* *Reject* – discard the message
* *Quarantine* – admit a message but send it to spam
* *None* – do nothing
Finally, if you use DMARC, email servers will send aggregate diagnostic reports on the performance of your emails. This way, you can quickly spot when legitimate emails fail a DMARC test, and you will be able to take action accordingly.
For a more detailed explanation of how DMARC works, please refer to our [DMARC](https://mailtrap.io/blog/dmarc-explained/) article.
**Example of a DMARC record**
Now, let’s look at the example of a DMARC record:
```
v=DMARC1; p=reject; rua=mailto:postmaster@mailtrap.io; ruf=mailto:postmaster@mailtrap.io; fo=1; pct=100; adkim=r; aspf=r
```
The tag descriptions are explained as follows:
* *v* -> version of DMARC. It’s always “DMARC1”.
* *p* -> DMARC policy in use.
* *rua* -> email addresses that will receive daily aggregate reports about emails failing DMARC checks.
* *ruf* -> address receiving real-time, individual alerts about failed checks. This can be the same or different from “rua”.
* *fo* -> (optional) setting for ruf reports. Available options: 0 – send if DMARC check fails; 1 – send if any check within DMARC fails (e.g., domain alignment for SPF); d – send only if DKIM fails; s – send only when SPF fails. Default value – ‘0’.
* *adkim* -> (optional) domain alignment for DKIM, can be either ‘r’ (relaxed) or ‘s’ (strict). Default value – ‘r’.
* *aspf* -> (optional) domain alignment for SPF, same options and default value as “adkim” above.
For further explanation and more optional tags, please check the [DMARC guide](https://mailtrap.io/blog/dmarc-explained/) we mentioned at the top of this section.
**Doing DMARC right**
Seeing how robust DMARC is, you would expect wide adoption across businesses and organizations. Sadly, the adoption rate is still low, and [maybe that’s why spoofing is still a serious threat](https://www.zdnet.com/article/dmarcs-abysmal-adoption-explains-why-email-spoofing-is-still-a-thing/). If you’ve already taken care of SPF and DKIM, there’s a strong case behind adding a DMARC to your portfolio.
It’s not worth rushing, though. It’s fairly easy to fail one of DMARC’s tests without proper preparation. For this reason, the “none” policy (as in the example above) is a recommended start.
This way, DMARC checks are still performed, and you receive forensic reports, but legitimate emails are not affected. A handy “pct” tag lets you also choose the percentage of emails that will be subject to a chosen policy. All others will be processed using “none”.
#### Reverse DNS & PTR Record
Another important mechanic that makes scammers’ lives miserable is Reverse DNS. It differs from typical authentication methods but is fairly easy to understand and configure.
Every domain on the internet resolves to a particular IP address. To make browsing and emailing easier, we use domains such as Mailtrap.io rather than the corresponding IPs (54.160.117.161 in this case). If you want to load our homepage, either method will work for any modern web browser.
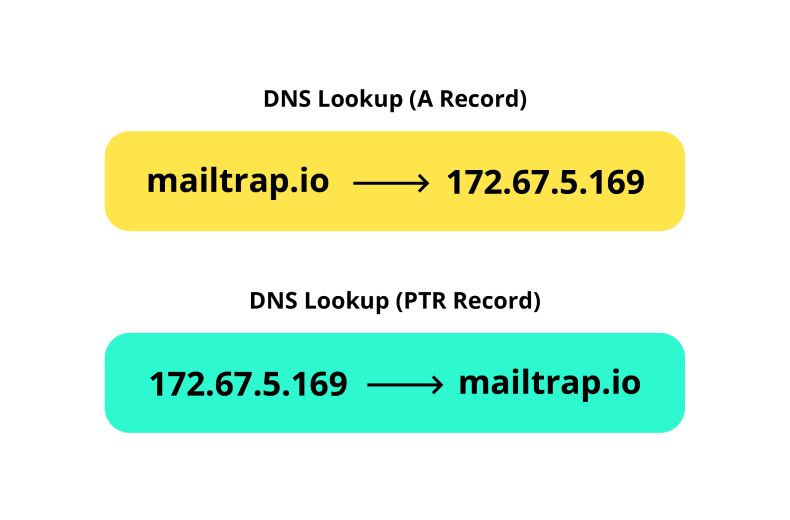
Since we also use domains rather than IPs when sending emails, email servers need to fetch the IP behind every domain each time. This process is called DNS Lookup. The record we’re looking for is an A Record. To add a layer of security, email servers run a reverse process simultaneously. It’s aptly named “Reverse DNS lookup”, and the records involved in it are called PTR records.
When a PTR record is detected, a server runs a check. For an email to pass this check, A PTR record needs to match an A record, as in the example above. When it does not match, or no record is found, an email is unlikely to reach the recipient’s inbox. Because of this, consider Reverse DNS to be a must-have solution, along with other authentication methods.
Check out our article on [PTR Records](https://mailtrap.io/blog/ptr-record/) for more on what they are, and how to set them up. Also, feel free to check this [DNS guide](https://social.dnsmadeeasy.com/blog/mail-delivery-and-spam-prevention-with-dns/) to learn more about spam prevention using these records.
***
## REFERENCES
*
*
*