SYSTEM ADMIN BOOK
  • Hardware/Physical Machines
    • Physical Networking
      • Patch Panel
    • Hardware Devices
    • PC Build
    • RAID Configs
  • System Configuration
    • Windows
      • OneDrive for Business, Map as Network Drive in Windows
      • PDF Printer
      • Reset Windows Password
    • Linux
    • Mac
      • Factory Reset Mac Mini
      • Install FortiClient VPN
      • Remove FortiClient VPN for Macs
      • Setting Microsoft Teams Notifications in MacOS
      • Download and Install Whatsapp
  • Windows Server
    • Troubleshooting
      • 100% Disk Usage Issue
      • Maximum Path Length Limitation
    • Basic Configurations
      • Change Hostname
      • Change Default RDP Port
      • Create a User
      • Add user to Administrator group
      • Add user to Remote Desktop Users group
      • Allow log on locally - security policy setting
      • Allow Multiple Remote Desktop Connections
      • Enable Insure Guest Authentication
      • Shrink Partition
      • Extend Partition
    • FTP Server
      • Install FTP Server (IIS)
      • Create User Group
      • Add FTP Site (IIS)
      • User Isolation
      • Allow Firewall
      • FTP Client (FileZilla)
      • FTP Server (FileZilla)
      • Configure Passive Mode in FileZilla Server
      • Configuring Windows Firewall for FileZilla Server
      • FileZilla: Password reset
      • Generate a New Self-Signed Certificate
    • Group Policy
      • Block Access to the Control Panel for All Users
      • Create a Logon Banner (Legal Notice)
      • Enable / Disable Copy-Paste Policy
      • Disable Shutdown, Restart Options
      • Disable Multiple Session for Single User
      • Disable Automatic Lock Screen in Windows Server
    • Services
      • NSSM - the Non-Sucking Service Manager
      • Node-windows Library
    • Task Scheduler
      • Automate Program Execution
      • Restart Windows Server Daily
    • Auditing and Diagnostincs
      • Enabling the System Event Audit Log
      • Audit RDP Port Change Event
      • Check the read/write speed of your hard drive
      • Clear temp file and .trc file
    • Event Viewer
      • Restart / Shutdown Event
    • Active Directory
  • Control Panels
    • Plesk
      • Set Hard Quota on disk space for subscription(s)
      • Changing MX, A, and CNAME Records
      • Host Node.js Application
      • Add FTP account
      • Remove FTP account
      • Download a folder using Plesk File Manager
      • Install WordPress on domain using WP Toolkit
      • Change the name of a Subscription system user
      • Exporting and Importing Database Dumps
    • OVI Panel
      • DNS Zone Editor
    • SolidCP
      • Add a MS SQL database in SolidCP
    • cPanel
  • Virtualization
    • Proxmox VE
      • Introduction
      • Download Proxmox ISO
      • Prepare Installation Media
      • Launch Proxmox Installer
      • Create a VM
  • Web Servers
    • IIS
      • Install IIS
      • Configure Default Site
      • Application Pool
      • Installing PHP
      • Deploy a PHP Application
      • Deploying a Laravel app on Windows using IIS
      • Update PHP Version in IIS
      • Host a Node.js /w Next.js Application
    • JBoss
  • VPNs and Proxy Servers
    • Reverse Proxy
      • IIS - Node.js Application
  • Database Servers
    • MS SQL
      • Download and Install
      • Install SSMS
      • Uninstall an Instance of SQL Server
      • Enable SA Account
      • Change SA Account Password
      • Enable Network Access to SQL Express
      • Create and configure a user in MSSQL
      • Clear SQL Server Cache
      • Setting Infinite Timeout in SQL Server Contexts
      • Take SQL Server Database Offline
      • Memory configuration
    • MySQL
      • Install and Configure MySQL
  • Web Dev Stacks
    • MERN (w/ Next)
      • Build and Run Node.js Project with Next.js
  • IT Ticketing Systems
    • Jira Ticketing System
  • Linux Servers
  • AWS Environment
  • Azure Environment
  • Backup and Security
    • SSL Certificates
      • Types of SSL Certificates
      • IIS 10: Create CSR and Install SSL Certificate
      • IIS 7: Generate CSR for Wildcard SSL
      • IIS: Generate CSR for Multi-Domain SSL
      • OpenSSL: Generate CSR
      • IIS 10: How to Install and Configure Your SSL Certificate on Windows Server
      • IIS: Export Pfx using MMC
      • IIS: Import Pfx using MMC
      • IIS: Export Pfx using IIS Manager
      • IIS: Import Pfx using IIS Manager
      • cPanel: Export PFX
      • Godaddy-CPanel: Generate a CSR
      • Godaddy-CPanel: Install SSL Certificate
      • cPanel: Generate CSR
      • cPanel: Install SSL Certificate
      • cPanel: Install Let's Encrypt SSL
      • Plesk: Generate CSR
      • Plesk: Let's Encrypt SSL Installation
      • Plesk: Installing the SSL certificate
      • Plesk: Export Public & Private Key
      • Win-ACME Let's Encrypt SSL
      • Certbot - Install SSL
      • Export Leaf, Root, and Intermediate Files
      • XAMPP - Let's Encrypt SSL Installation
      • JBoss Web Server: CSR Generation
      • JBoss: Install SSL Certificate
    • Backup
      • Database
        • MS SQL DB Backup
        • MS SQL Restore Backup
    • Microsoft Defender for Endpoint
      • Introduction & Licenses
    • Microsoft Intune - Endpoint Management
      • Product Introduction
      • Intune Policies for MacOS
      • Enroll your macOS device using the Company Portal app
    • Vulnerability Scanning
      • OpenVAS Quick Guide
      • Nessus Quick Guide
    • Acronis
      • Download and Install the Acronis Cyber Protection Agent
      • Performing a file-level backup
      • Creating a disk-level backup
      • Performing a file-level recovery
      • Enabling Active Protection and Vulnerability Assessment
  • Email and Office 365
    • Troubleshooting
      • Run a message trace in the Exchange admin center
      • Not receiving email
      • Office 365 Apps Activation Error
      • Gmail Issue: Clearing Cache and Cookies
      • Excel worksheet, right click insert not functioning
      • Microsoft 365 Apps activation error: “Your organization has disabled this device”
    • Hybrid Mail Setup
      • Set Up Connectors Between Microsoft 365 and SmarterMail
    • Email Authentication
      • Protocols
    • Mail Clients
      • Outlook
        • Maximum number of Exchange accounts in an Outlook profile
        • Enable automatic forwarding in new Outlook
        • Add Email Signature
        • Create Email Singature
        • Gmail Account Login in Outlook
        • Enable desktop notifications for Outlook on the Web (OWA) in Windows
        • Move Mails to Specific Folders
      • Apple Mail
        • Add email accounts in Mail on Mac
        • Add Mail Signatures
      • Gmail
        • Mail Forwarding to Another Account
        • Set Up an Auto-Reply (Vacation Responder) in Gmail
    • Office 365
      • Intro & Subscriptions
      • How to Create a Trial Account
      • How to Access the Office 365 Admin Center
      • Creating a Tenant
      • Create Users
      • Add several users at the same time to Microsoft 365
      • Creating & Managing Roles
      • Add a Domain
      • Manage MFA
      • Let users reset their own passwords
      • Assign Global Admin Roles
      • Create APP Password
      • Change a user name and email address
      • Reset MFA for Microsoft 365 User
      • Configure email forwarding
      • Add email aliases to a user
      • Change Username or Email Address
      • Export Mailbox to PST From Office 365
      • Import PST to Exchange Online (Microsoft O365)
      • Enable archive mailboxes for Microsoft 365
      • Grant Export Permission in M365 Compliance Center
      • Generate Transfer Token
    • Google Workspace
      • Intro & Plans
      • Create your Google Workspace trial account
      • Review your DNS records
      • Adding Users
      • Create organizational units
      • Restrict access to a Google Workspace service
      • Edit user attributes
      • Manage user accounts
      • Suspend a User
      • Generate a Transfer Token
      • Reduce Licenses in Google Workspace
      • Auto-forward From Google Workspace Using Routing
      • Recovering administrator access to your account
    • MailEnable
    • SmarterMail
      • SmarterMail Installation
      • SmarterMail Server Setup
      • Installation and Configuration (Practical)
      • Enable / Disable Domain in SmarterMail
      • Enable / Disable MFA for User Accounts
      • Create an Administrator User in SmarterMail
    • Microsoft Teams
      • Guest Access vs. External Access
      • Adding Guests To Microsoft Teams Team
      • Teams Chat DIfferent Domain: Enable External Access
      • Setup Teams Time Zone and Work Hours
      • Add Contact Numbers in Profile Page
    • Microsoft Defender for Office 365
      • Remove blocked users from the Restricted entities page
    • Microsoft Purview
      • Create a Retention Policy for Archiving in M365
  • DevOps
  • Firewalls and Access Points
    • Windows Firewall
      • Allow Ports on Windows Firewall
    • Sophos Firewall
      • Set up a new firewall with Sophos Central
      • Enable Sophos Central management of Sophos Firewall
  • Networking
    • Troubleshooting
    • Cisco Router Config
    • Cisco Switch Config
      • Basic Data and Voice VLAN Setup Homelab
  • Migration
    • Drive Migration
      • Google Drive to One Drive
      • One Drive to One Drive [SharePoint Migration Tool]
      • Migrate Google files to Microsoft 365 for business
    • Mail Migration
      • Google Workspace to Office 365 (Manual Method)
      • Google Workspace to Office 365 (Automatic Method)
      • IMAP to Office 365
      • Migration Using PST File Method
      • Office 365 to Google Workspace Migration
      • G-Suite to G-Suite Migration
    • VM Migration
    • Website Migration
      • Migrating IIS Sites Using Web Deploy
      • Plesk to Plesk Migration
    • Database Migration
  • Monitoring
    • Prometheus
      • Monitoring Windows Servers Using Prometheus
    • Grafana
      • Visualize Data in Grafana
    • Loki
  • Data Center
    • HPE ProLiant ILO Configuration
  • Other Technologies
    • Some R&Ds
      • Active vs. Passive Mode in FTP
      • IIS Recycling and Virtual Memory Limit
      • IIS Application Pool
Powered by GitBook
On this page
  • Set up your Sophos Firewall and claim it in Sophos Central
  • Activate a new subscription or evaluation from Sophos Firewall
  • Activate a new subscription
  • Check your subscription has synchronized with Sophos Central
  • Synchronize your firewall subscriptions with Sophos Central
  • Check your subscription has synchronized with Sophos Firewall
  • REFERENCES

Was this helpful?

  1. Firewalls and Access Points
  2. Sophos Firewall

Set up a new firewall with Sophos Central

PreviousSophos FirewallNextEnable Sophos Central management of Sophos Firewall

Last updated 2 months ago

Was this helpful?

You can set up your Sophos Firewall devices with Sophos Central and manage them centrally.

Note

You can only manage firewalls with Sophos Central if they connect to the internet using IPv4 addresses.

Set up your Sophos Firewall and claim it in Sophos Central

  1. Type the web admin console address into your browser, followed by port 4444. Example: 172.16.16.16:4444.

    By default, Sophos Firewall uses a locally-signed certificate, so your browser shows a warning message. When you pass the certificate warning, you see the Welcome to Sophos Firewall page.

  2. Accept the Sophos End User Terms of Use.

  3. Click Start setup.

    You're prompted to perform basic configuration.

  4. Deselect Install the latest firmware automatically during setup (recommended), then click Continue.

  5. Enter a firewall name, choose the time zone, and then click Continue.

  6. Select I have an existing serial number, enter your firewall's serial number, then click Continue.

    Claim your firewall with Sophos Central appears.

  7. Click Claim in Sophos Central.

    You're redirected to Sophos Central. You'll be prompted to sign in if you're not signed in already.

    Claim firewall appears.

  8. Enter your firewall's serial number.

  9. Click Validate.

  10. Select Claim with 30 days Xstream Protection, Web Server Protection and Email Protection evaluation license, or Just claim the firewall with Base license.

  11. Click Claim firewall.

    You're redirected to Sophos Firewall.

  12. On the Basic setup is complete page, click Skip to finish.

    (Optional) If you want to configure advanced settings, click Continue.

    When the setup is complete, you're redirected to the firewall's sign-in screen.

  13. Sign in to the firewall, then go to Administration to see your firewall's details.

  14. Sign in to Sophos Central, then go to My Products > Firewall Management > Firewall Licenses.

  15. Search for your firewall, then click the arrow next to its name to see its details.


Activate a new subscription or evaluation from Sophos Firewall

Activate a new subscription

  1. Sign in to Sophos Firewall and go to Administration.

  2. Click Activate subscription.

    Activate license key appears.

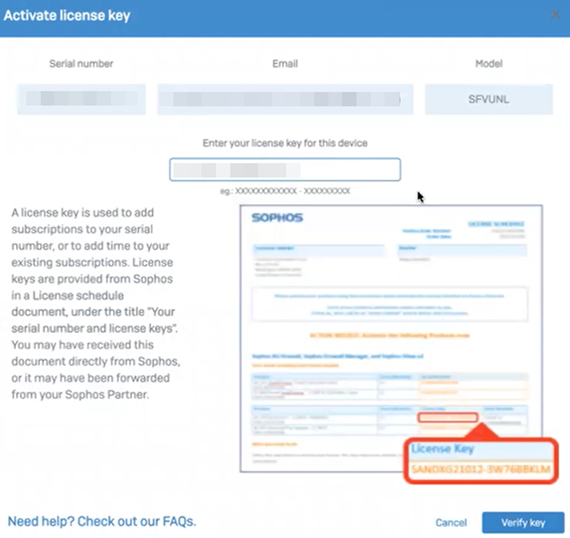
  3. Enter your license key.

  4. Click Verify key.

  5. Check your subscription details and click Confirm.

    Under Module subscription details, the status of your new subscription is Subscribed.

Check your subscription has synchronized with Sophos Central

  1. Sign in to Sophos Central.

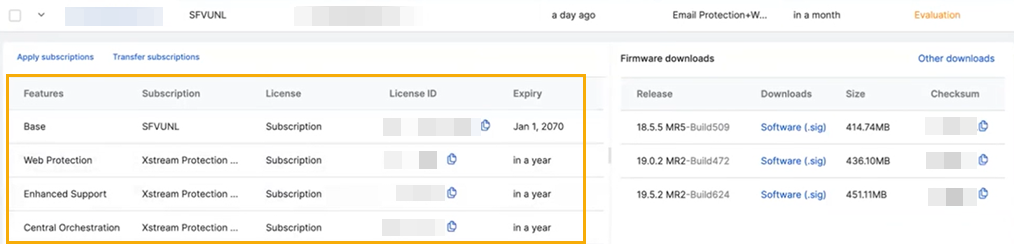
  2. Go to My Products > Firewall Management, then click Firewall licenses.

  3. Search for your firewall, then click the arrow next to its name to see its details.


Synchronize your firewall subscriptions with Sophos Central

  1. Sign in to your Sophos Central account.

  2. Go to My Products > Firewall Management > Firewall licenses.

  3. Search for your firewall, then click the arrow next to its name to see its details.

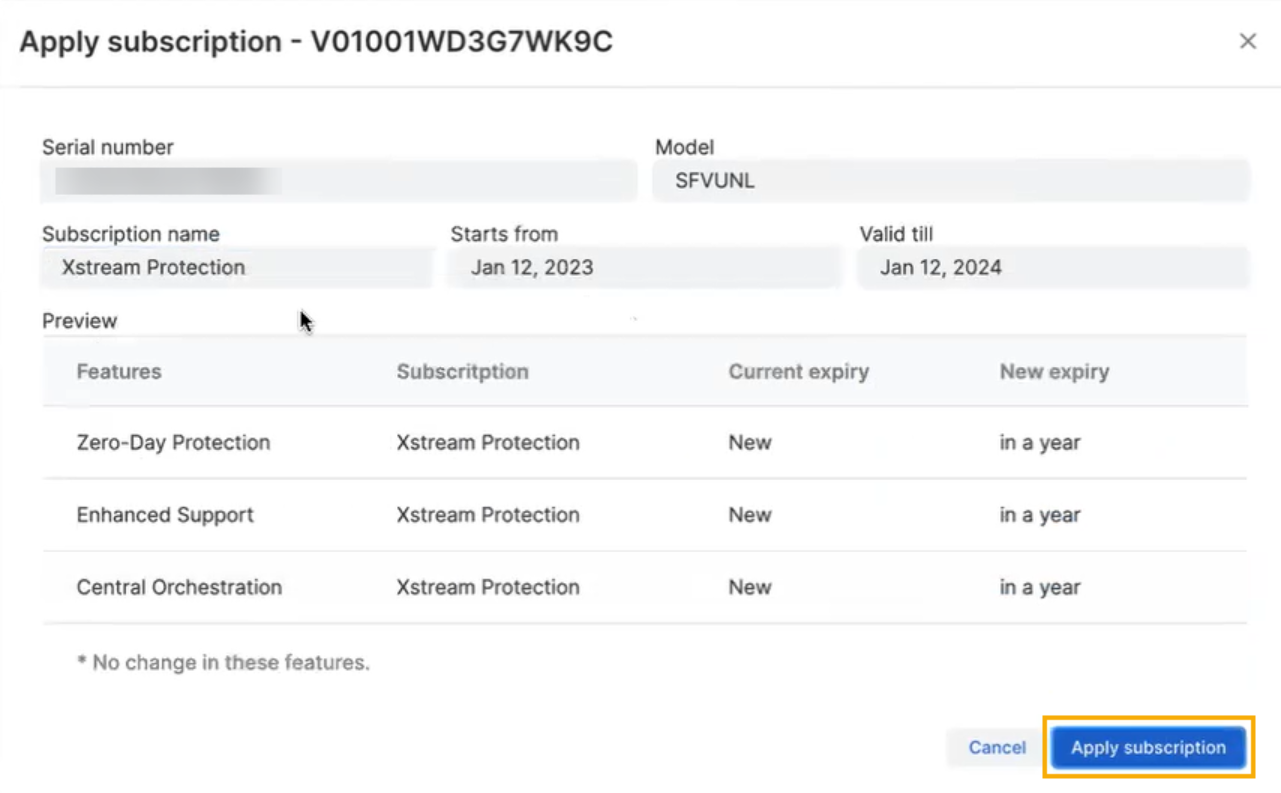
  4. Click Apply subscriptions.

  5. Enter your subscription key, then click Preview subscription.

  6. Review your subscription details, then click Apply subscription.

    You'll see your new subscriptions in your firewall details.

Check your subscription has synchronized with Sophos Firewall

  1. Sign in to Sophos Firewall and go to Administration.

  2. Click Synchronize.

    You'll see your new subscriptions under Module subscription details.


REFERENCES

  • https://docs.sophos.com/nsg/sophos-firewall/21.0/Help/en-us/webhelp/onlinehelp/AdministratorHelp/SophosCentral/HowToArticles/FirewallClaim/index.html