Change Hostname

Changing Server name/Hostname in Windows Server 2022

We can change the computer/Server name using the following two ways:

  1. Change Server Name using Server Manager (Graphical User Interface)

  2. Change Server Name using PowerShell (Command-line)

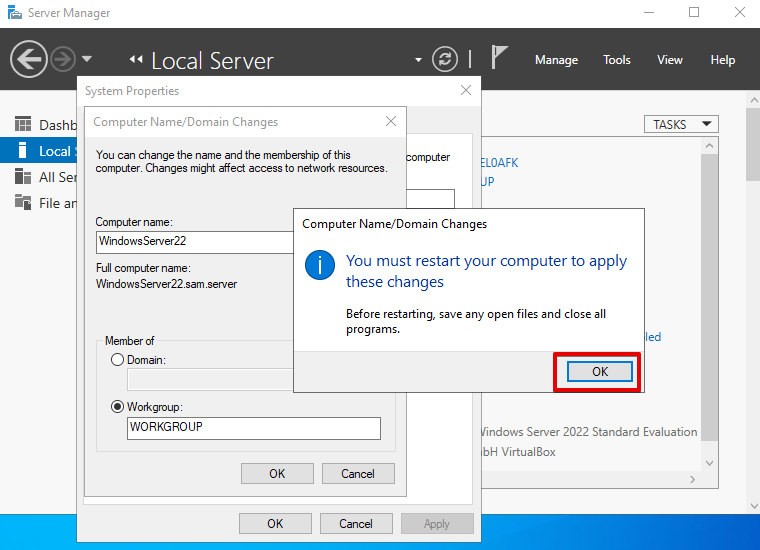
Method # 01: Change Server Name using Server Manager (Graphical User Interface)

Using the ‘Server Manager’ GUI, you can easily change the server name. When you start your system, it automatically launches on your desktop. Otherwise, you can also launch Windows ‘Server Manager’ from the Start menu of your Windows Server.

screenshot of Start menu with highlighted a Server Manager

Click on the ‘Local Server’ from the left sidebar menu and click on the ‘Computer name’.

screenshot of Server Manager

The ‘System Properties’ dialog appears on the screen. Click on the ‘Change’ button in the ‘Computer Name’ tab.

screenshot of System Properties with highlighted a Change button

Enter the server name in the ‘Computer name’ field that you want to use as a server name. Further, click on ‘More’.

screenshot of Computer Name/Domain Changes window

Enter the primary DNS suffix for your computer. Click on ‘OK’.

screenshot of DNS Suffix and NetBIOS Computer Name window

At this point, you need to restart your Windows Server to apply the above changes.

screenshot of Computer Name/Domain Changes window with highlighted an OK button

Now, click ‘Restart Now’ which will restart your computer right away.

screenshot of Restart button

To verify changes, again open the ‘Server Manager’ and you will notice that the computer name is successfully changed or updated.

screenshot of highlighted Computer Name


Method # 02: Change Server Name using PowerShell (Command-line)

You can also change the server name using PowerShell commands. Most Windows users prefer to use PowerShell while working on Windows Server. So, you need to perform the following steps to change the server name in the windows server via PowerShell:

Open the PowerShell window from the Start menu of Windows Server.

Now, use the following syntax to change the server name:

Rename-Computer -NewName [Server-name] -Force -PassThru

Replace the ‘Server-name’ with the name that you want to set for your computer. For example, here we choose the name ‘Win-Server2022’. Now, run the following command with administrative privileges:

Rename-Computer -NewName “Win-Server2022” -Force -PassThru

After running the above command following output will show on the PowerShell terminal:

screenshot of the PowerShell command

To effect the changes, you must restart your computer. So, restart your system by using this command:

Restart-Computer


REFERENCES

Last updated

Was this helpful?