# Google Workspace to Office 365 (Automatic Method)
## Prerequisites
{% hint style="success" %}
## Need to Enable the below Settings on admin.google.com
"Google Cloud Platform service has been disabled. Please contact your administrator to turn the service on in the Google Workspace Admin console." - ERROR while creating the migration batch
* **Go to** the [Google Admin Console](https://admin.google.com).
* Navigate to:\
**Apps** → **Additional Google services**.
* Search for **"Google Cloud Platform"** or **"Cloud Platform"**.
* Click on it and **enable the service** for the organizational unit (OU) your account belongs to.
* Enable Service Account Creation option for all users.
{% endhint %}
### Check Google Cloud platform permissions
An [automated scenario](https://learn.microsoft.com/en-us/exchange/mailbox-migration/automated-migration-neweac) requires the Google Migration administrator to be able to perform the following steps in the [Google admin console](https://admin.google.com/AdminHome):
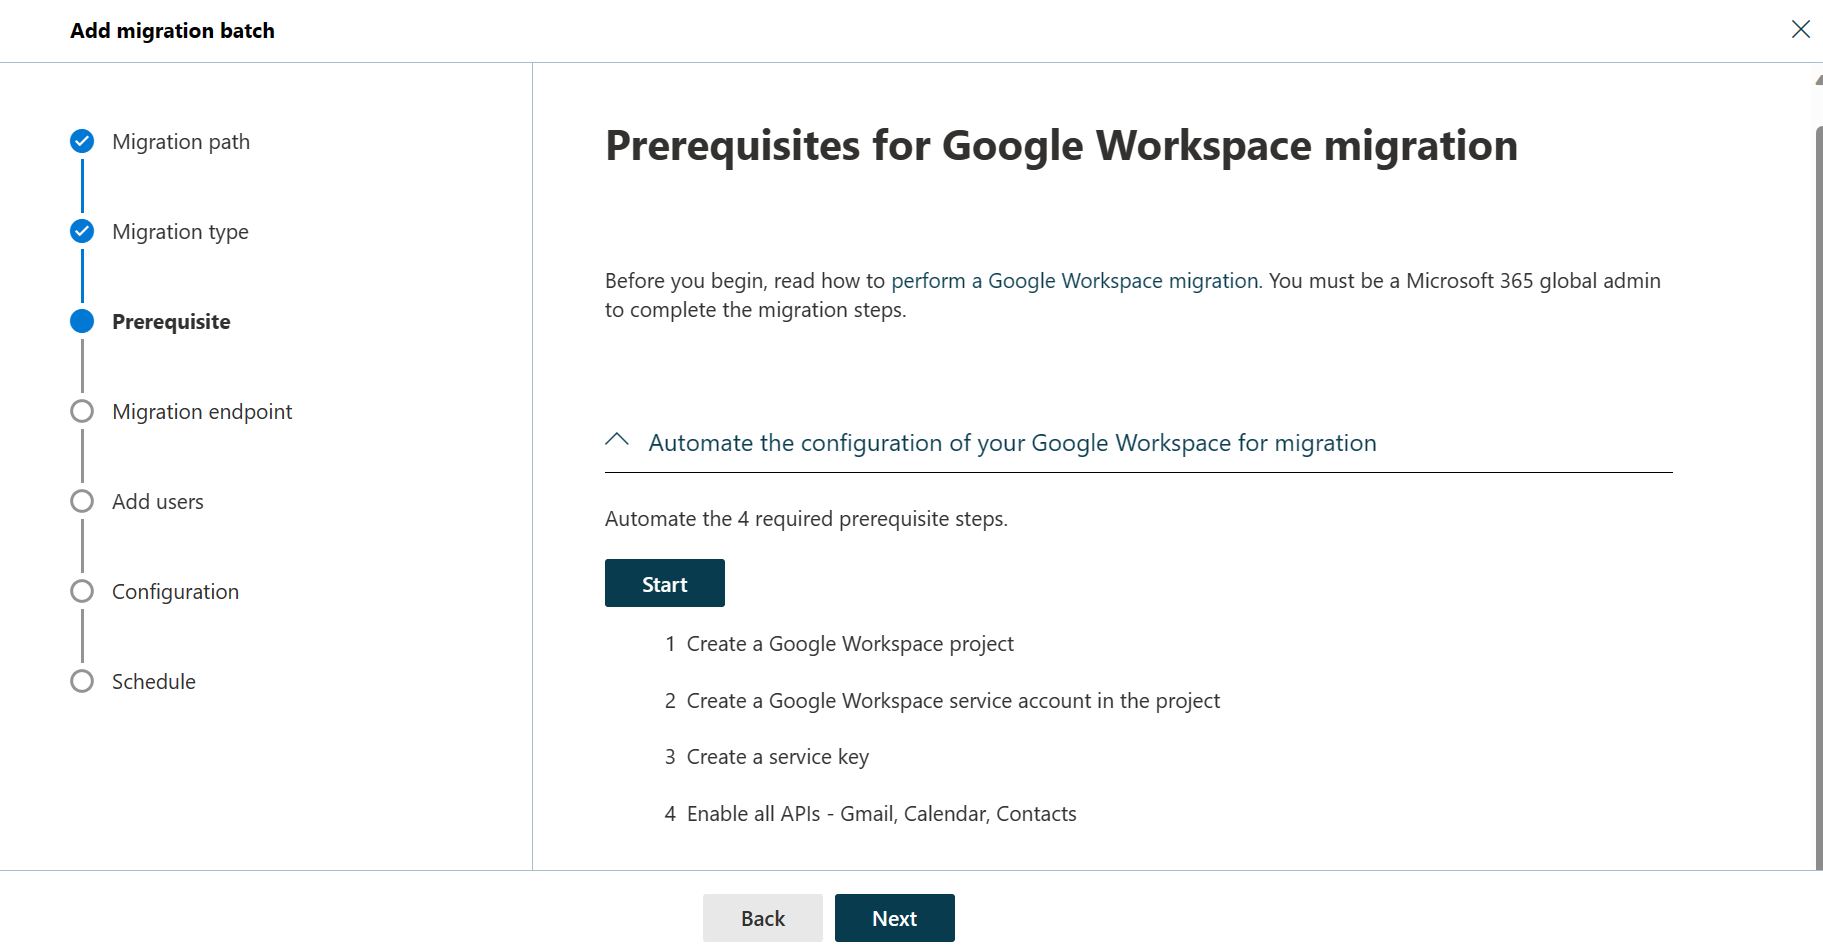
1. Create a Google Workspace project.
2. Create a Google Workspace service account in the project.
3. Create a service key.
4. Enable all APIs - Gmail, Calendar, and Contacts.
The Google Migration administrator needs the following permissions to complete these steps:
* resourcemanager.projects.create
* iam.ServiceAccounts.create
The most secure way to achieve completion of these four steps is to assign the following roles to the Google Migration administrator:
* Project Creator
* Service Accounts Creator
Here's how you do it:
1. Navigate to [https://console.developers.google.com](https://console.developers.google.com/).
2. Expand the hamburger menu in the upper right-hand corner.

3. Select **IAM & Admin**.
4. Select **Manage Resources**.
5. Select the appropriate resource and in the right-hand pane under the **Permissions** tab, select **Add Principal**.
6. Enter your Google Migration administrator credentials, enter *Project Creator* in the filter, and select **Project Creator**.
7. Select **Add Another Role**, enter *Create Service Accounts* in the filter, and select **Create Service Accounts**.
8. **Other Roles (Need to Assign on the admin user):**
1. **Create Service Accounts**
2. **Organization Administrator**
3. **Owner**
4. **Service Account Key Admin**
5. **Service Account User**
6. **Project Creator**
7. **Organization Policy Administrator**
9. **Other Roles (Need to Assign on the Organization):**
1. **Access Transparency Admin**
2. **Browser**
3. **Create Service Accounts**
4. **Delete Service Accounts**
5. **Editor**
6. **Organization Administrator**
7. **Organization Policy Viewer**
8. **Organization Policy Administrator**
9. **Owner**
10. **Project Creator**
10. Select **Save**.
{% hint style="warning" %}
**Note**
It might take up to 15 minutes to propagate role assignment changes across the globe.
{% endhint %}
***
{% hint style="danger" %}
## ISSUES
* **Problem:** The Google Cloud service account used for the migration might not have the required permissions to create and manage keys, leading to the JSON file not being downloaded automatically.
* **Solution:**
* Navigate to Google Cloud's IAM & Admin console and ensure the service account has the **Organization Policy Administrator** role.
* In **Organization Policies**, locate **"Disable service account key creation"** and **"Disable Service Account Creation"** set it to **OFF.**
{% endhint %}
{% hint style="danger" %}
## Additional Settings
I had the same problem after completing the EOP wizard for Workspace migration. Took me a couple of hours to figure out 8-/
With a Workspace super admin, login to . Make sure you're working in the root org.
* Select IAM and admin.
* In IAM on left-hand menu, edit permissions for organisation.
* Add Organisation Policy Administrator and save.
* Go to Organisation policies in left-hand menu.
* Search for 'Disable service account key creation'.
* Edit policy, set Enforcement to Off and save.
* Change workspace from root org to the project the 365 wizard created. Mine was called projectnamempij.
* In IAM and admin, go to Service accounts in left-hand menu.
* In the 3 dots menu besides the service account, select Manage keys.
* When in service account, Add key -> Create new key.
* The json file is created and downloaded.
* Create a new endpoint in Exchange Online and use the downloaded json
{% endhint %}
***
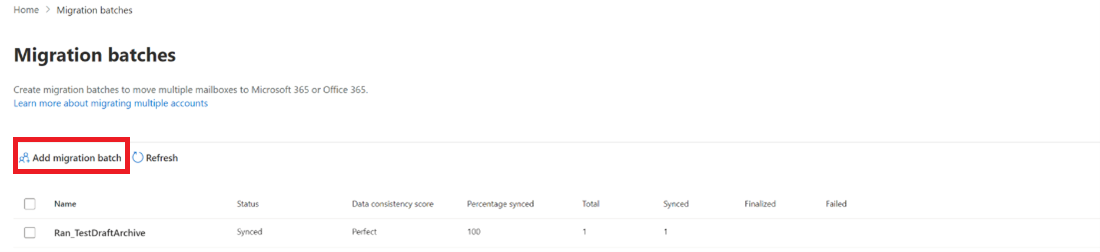
## Start an automated Google Workspace migration batch in EAC
1. In the [Exchange Admin center](https://admin.exchange.microsoft.com/), go to **Migration**, and then select **Add migration batch**.
The **Add migration batch** page appears.
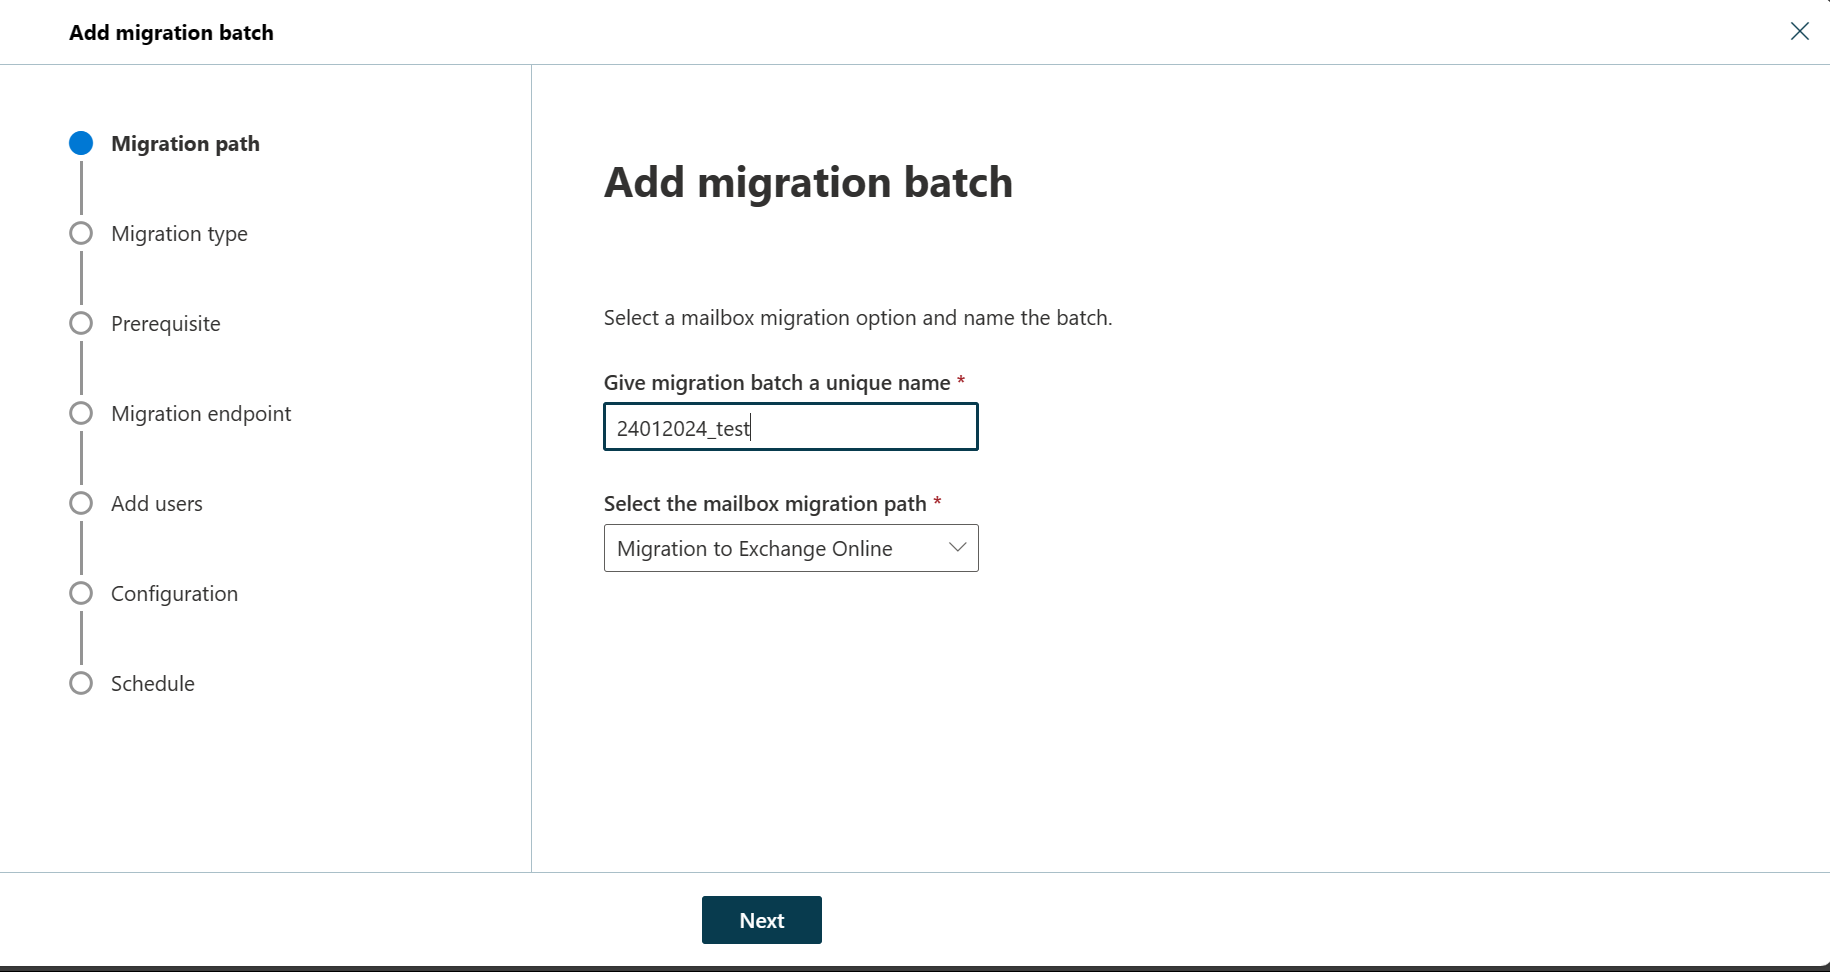
2. Configure the following settings:
* **Give migration batch a unique name**: Enter a unique name.
* **Select the mailbox migration path**: Verify that **Migration to Exchange Online** is selected.
When you're finished, click **Next**.
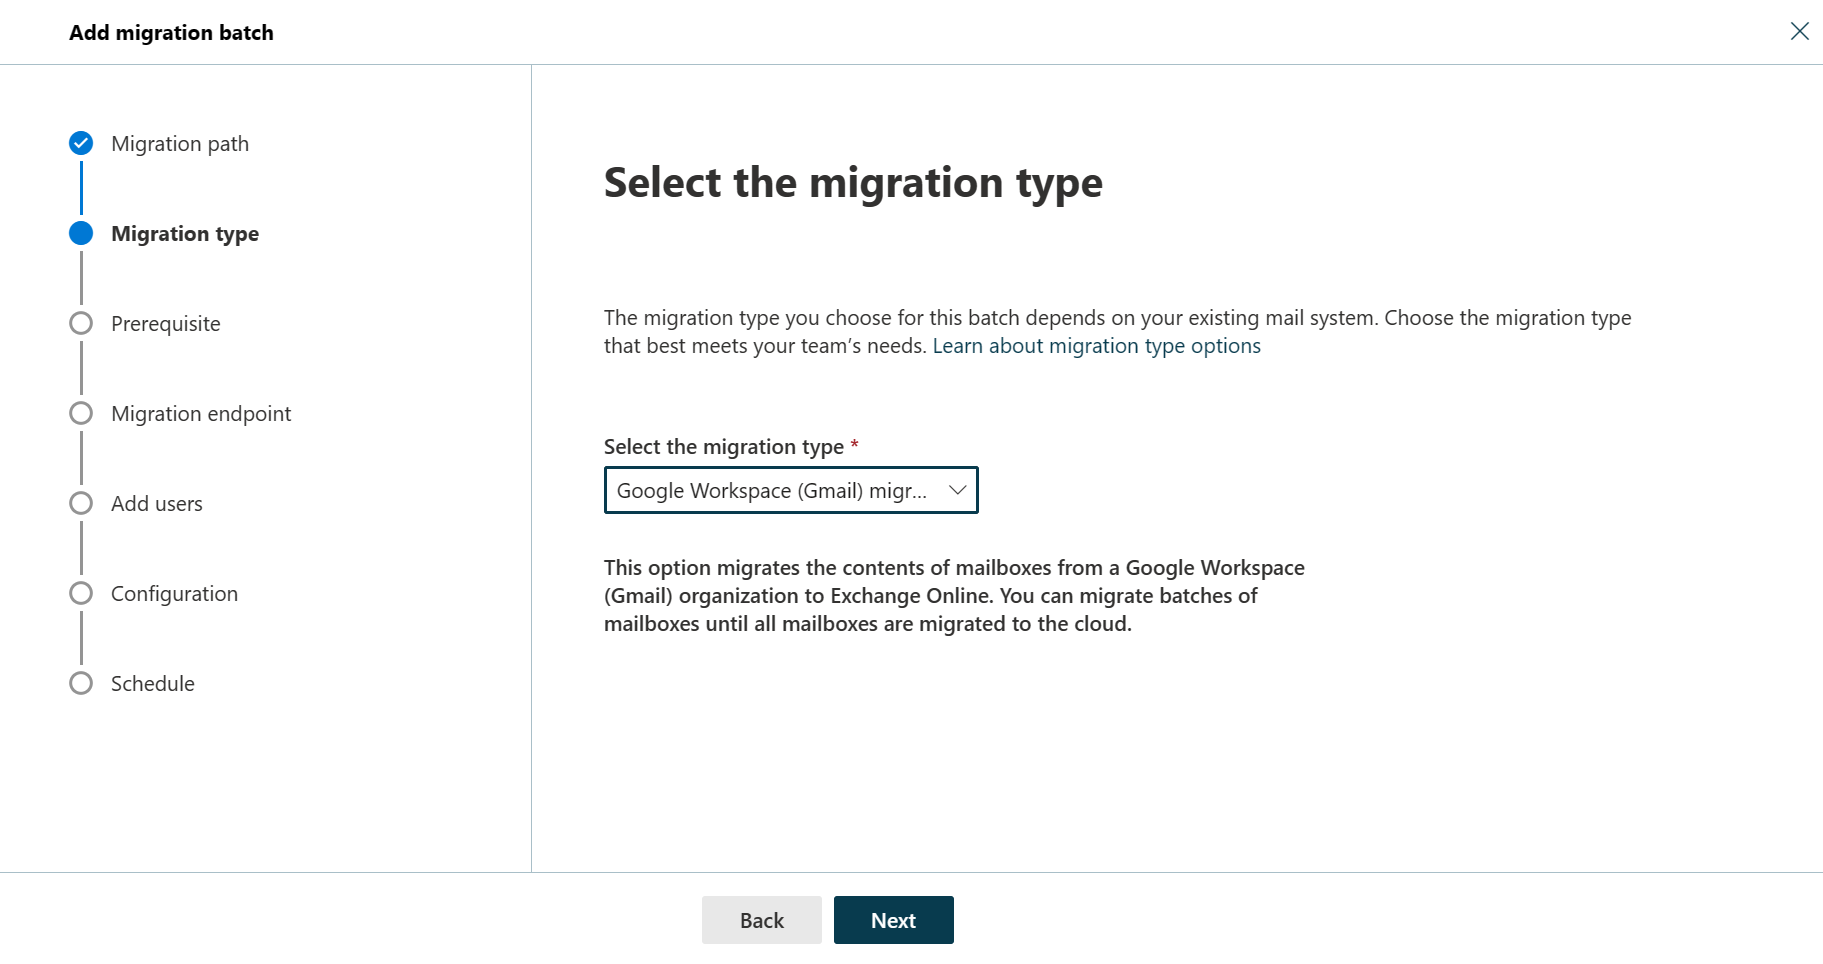
3. On the **Select the migration type** page, select **Google Workspace (Gmail) migration** as migration type, and click **Next**.
The **Prerequisites for Google Workspace migration** page appears.
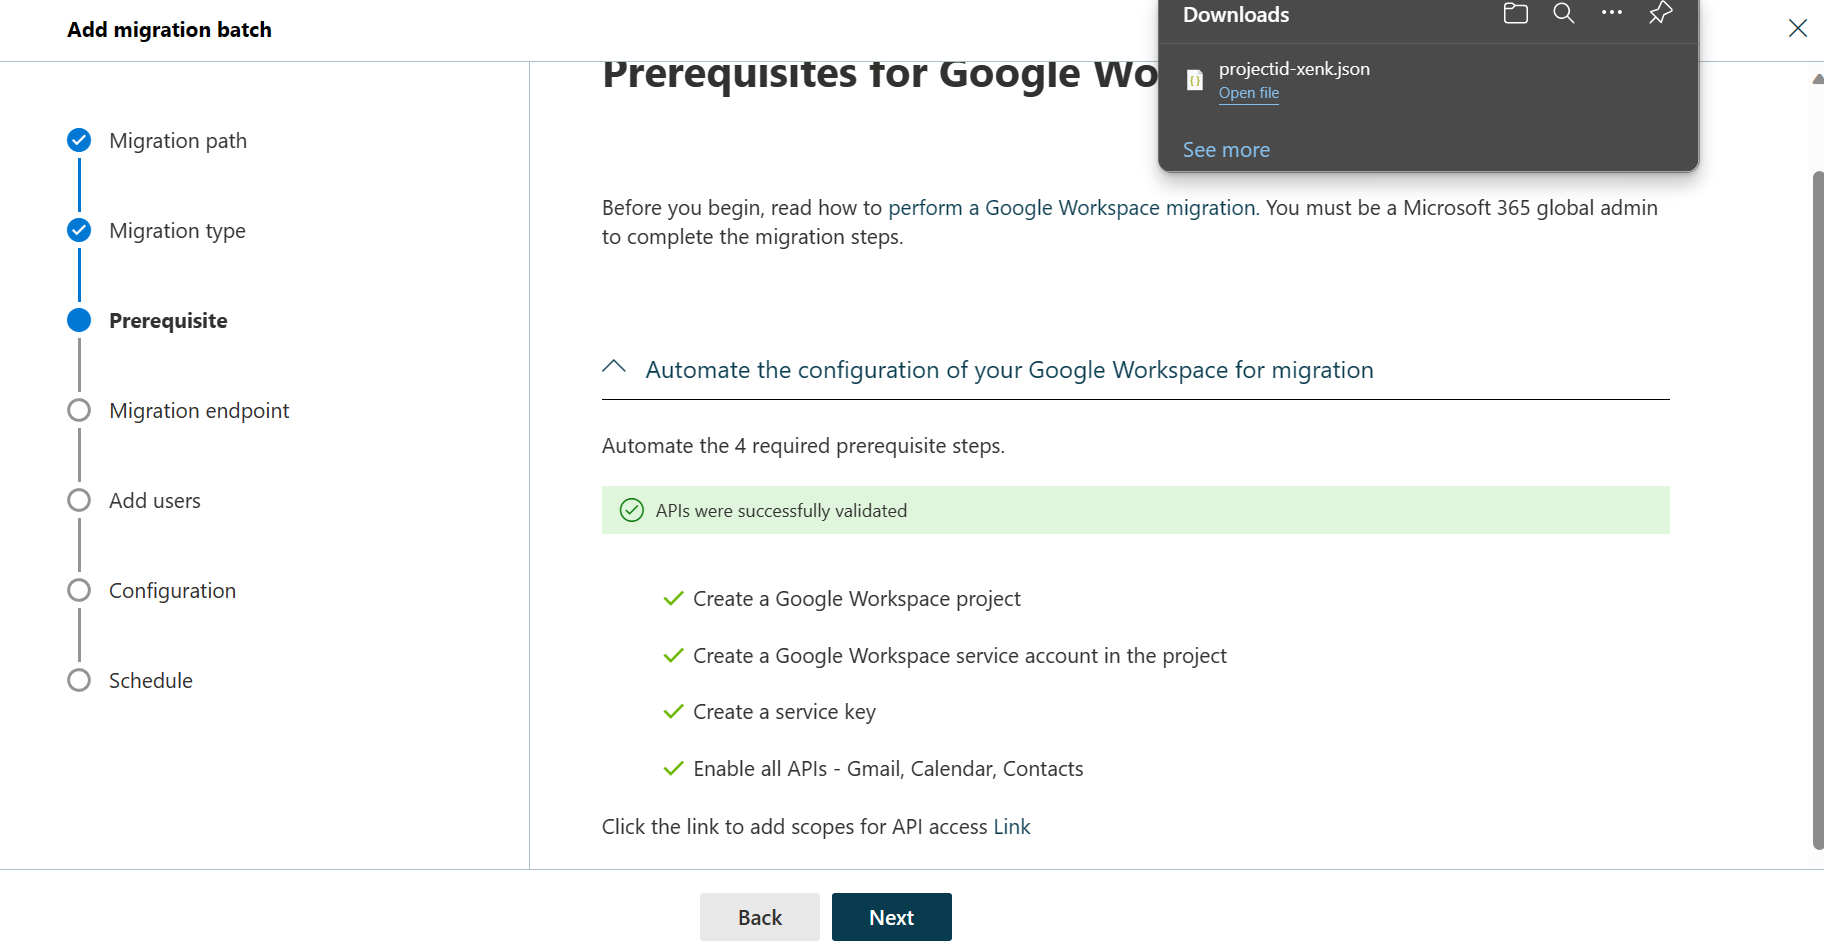
4. Verify that the **Automate the configuration of your Google Workspace for migration** section is expanded, and then select **Start** in that section to automate the four required prerequisite steps.
5. In the Google sign-in page that appears, sign in to your Google account to validate your APIs.
\
Once the APIs are successfully validated, the following things happen:
* A JSON file (projectid-\*.json) is downloaded to your local system.
* The link to add the ClientID and the Scope is provided. The ClientID and Scope are also listed for your reference.
6. Select the API access link. You'll be redirected to Google Admin API Controls page.
7. Select **Add new**. Copy the ClientID and Scope from the EAC, paste it here, and then select **Authorize**.
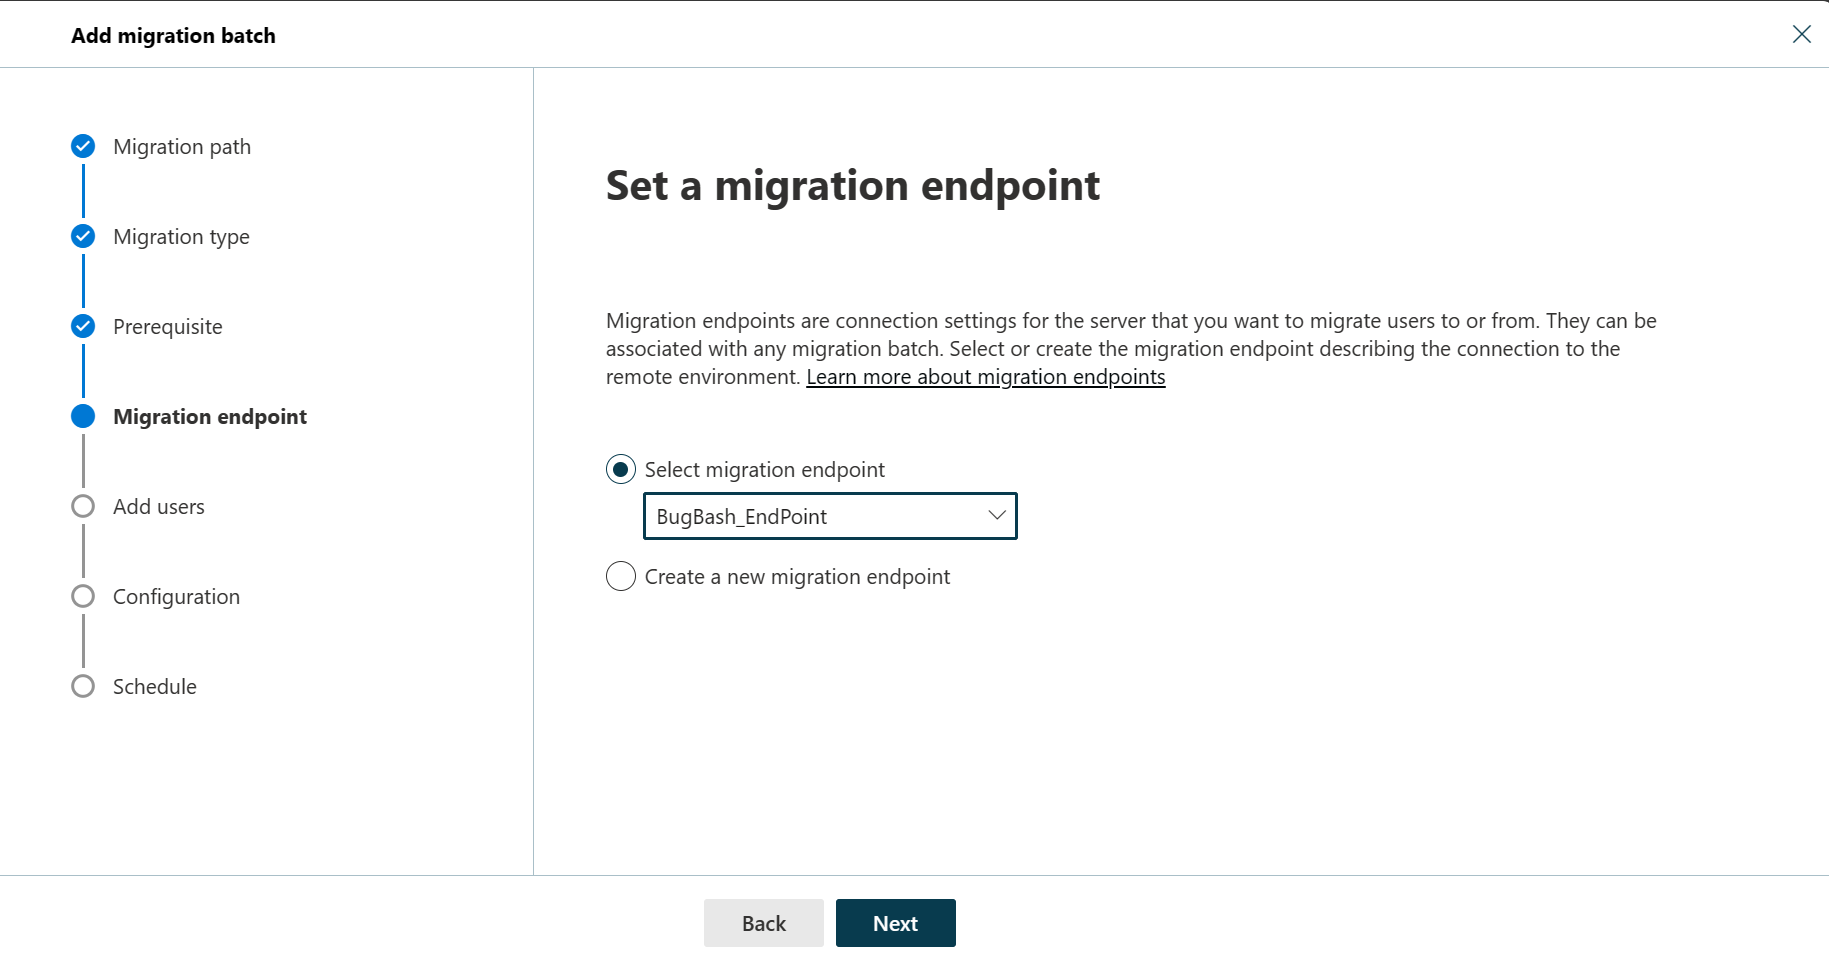
8. Once the four prerequisites-related steps are completed, select **Next**. The **Set a migration endpoint** page appears.
9. Select one of the following options:
* **Select the migration endpoint**: Select an existing migration endpoint from the drop-down list.
* **Create a new migration endpoint**: Select this option if you're a first-time user.
{% hint style="warning" %}
**Note**
To migrate Gmail mailboxes successfully, Microsoft 365 or Office 365 needs to connect and communicate with Gmail. To do this connection-communication, Microsoft 365 or Office 365 uses a migration endpoint. Migration endpoint is a technical term that describes the settings that are used to create the connection so you can migrate the mailboxes.
{% endhint %}
If you've selected **Create a new migration endpoint**, do the following steps:
1. On the **General Information** page, configure the following settings:
* **Migration Endpoint Name**: Enter a value.
* **Maximum concurrent migrations**: Leave the default value **20** or change the value as required.
* **Maximum concurrent incremental syncs**: Leave the default value **10** or change the value as required.
When you're finished, select **Next**.
2. On the **Gmail migration configuration** page, configure the following settings:
* **Email address**: Enter the email address that you use to sign in to the Google Workspace.
* **JSON key**: Select **Import JSON**. In the dialog box that appears, find and select the downloaded JSON file, and then select **Open**.
Once the endpoint is successfully created, it will be listed in the **Select migration endpoint** drop-down list.
* Select the endpoint from the drop-down list, and select **Next**. The **Add user mailboxes** page appears.
1. Select **Import CSV file** and navigate to the folder where you've saved the CSV file.
If you haven't already saved or created the CSV file, create a CSV file containing the set of names of the users you want to migrate. You'll need its filename below. The allowed headers are:
* **EmailAddress** (required): Contains the primary email address for an existing Microsoft 365 or Office 365 mailbox.
* **Username** (optional). Contains the Gmail primary email address, if it differs from EmailAddress.
**CSV**
```csv
EmailAddress
will@fabrikaminc.net
user123@fabrikaminc.net
```
When you're finished, click **Next**. The **Move configuration** page appears.
11. From the **Target delivery domain** drop-down list, select the target delivery domain (the subdomain) that was created as part of fulfilling the [Google Workspace migration prerequisites in Exchange Online](https://learn.microsoft.com/en-us/exchange/mailbox-migration/google-workspace-migration-prerequisites), and click **Next**.
{% hint style="warning" %}
**Note**
The target delivery domain (the subdomain) you select in this step can be either an existing one or the one that you've created in [Google Workspace migration prerequisites in Exchange Online](https://learn.microsoft.com/en-us/exchange/mailbox-migration/google-workspace-migration-prerequisites).
If you don't see the target delivery domain that you want to select in the **Target delivery domain** drop-down list, you can manually enter the name of the target delivery domain in the text box.
The text box in which you manually enter the name of the target delivery domain is **Target delivery domain**. That is, the text box is effectively the **Target delivery domain** drop-down list, which is taking the role of a text box when you manually enter text into it.
Filtering options have been introduced for the migration of Google Workspace to Microsoft 365 or Office 365. For more information on these filtering options, see [Filtering Options for Google Workspace migration](https://learn.microsoft.com/en-us/exchange/mailbox-migration/automated-migration-neweac#filtering-options-for-google-workspace-migration).
{% endhint %}
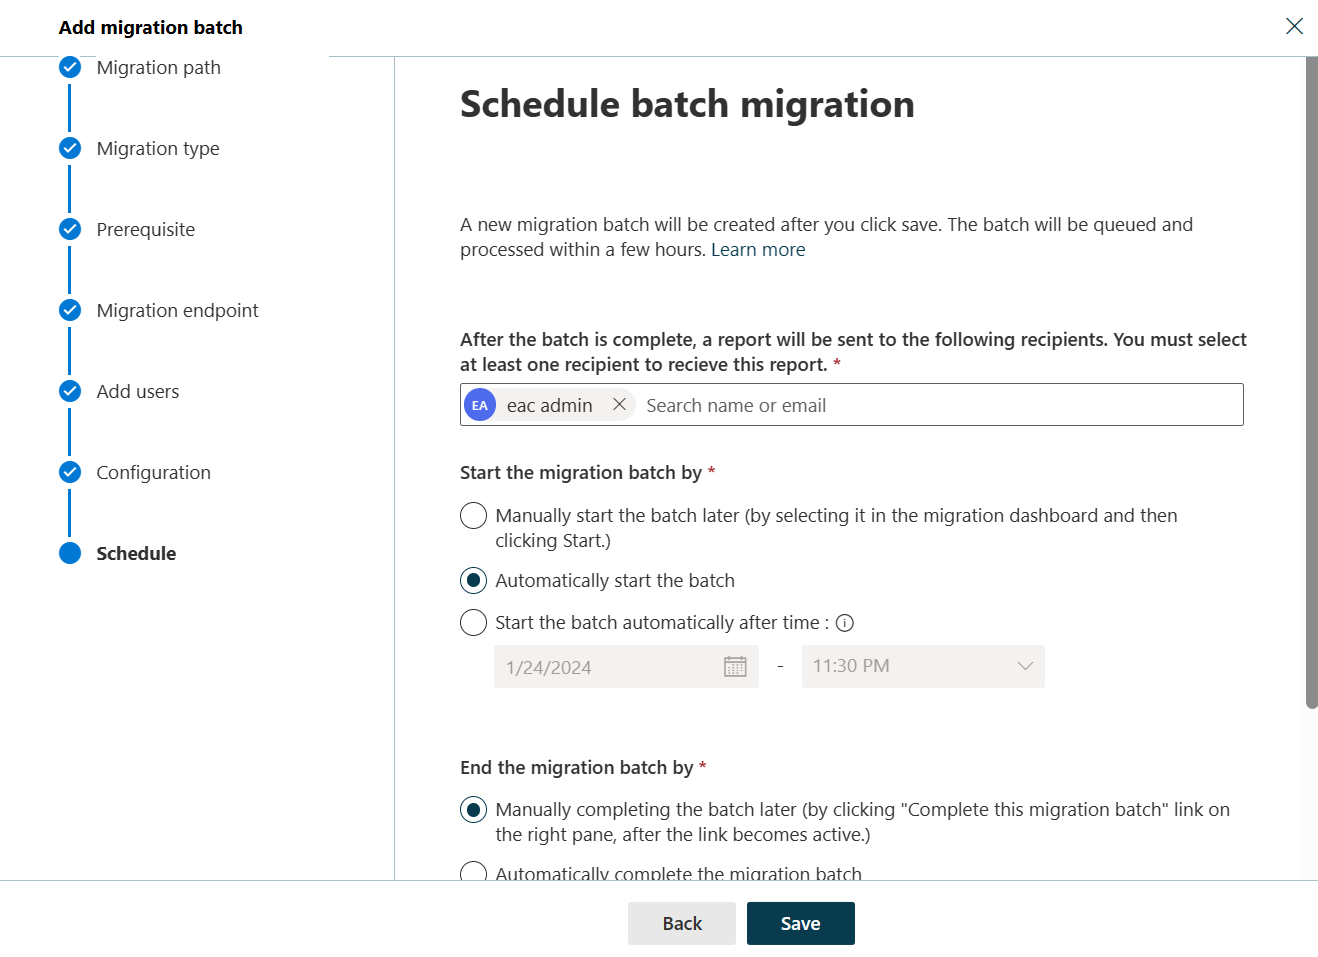
12. On the **Schedule batch migration** page, verify all the details, click **Save**, and then click **Done**.
Once the batch status changes from **Syncing** to **Synced**, you need to complete the batch.
{% hint style="warning" %}
#### Filtering Options for Google Workspace migration
Filtering options enable you to determine what are the mail-related components to be migrated from the Google Workspace.
The filter options for the Google Workspace migration are:
* Mail
* Calendar
* Contacts
* Rules
{% endhint %}
***
## REFERENCES
*
*
*
*
*