7. Configure IIS to serve Django Applications
This is the last major section of this tutorial!
As noted at several places in Django docs, the “Django development server” is not designed for production use, so using a production-quality web server such as IIS is mandatory for production applications.
1. Configure FastCGI in IIS
Open the IIS Manager
Click on the name of the server in the list on the left. If you see the following dialog box, check the box “Do not show this message” and click “No.” (You can always get to this later if necessary by clicking “Get New Web Platform Components” under “Actions” on the right-hand side of IIS Manager.)
Double-click the “FastCGI Settings” icon
Under “Actions” on the right-hand side click “Add application …”
In the Add FastCGI Application dialog, in the “Full Path” box, type the path to the Python executable for the application’s virtual environment: C:\virtualenvs\foo\Scripts\python.exe
In the Arguments input box, type the path to the wfastcgi.py file in the application’s virtual environment: C:\virtualenvs\foo\Lib\site-packages\wfastcgi.py
At this point your settings in the Add FastCGI Application dialog should look like this:
With the Add FastCGI Application dialog box still open, under the “General” section, click on the “Environment Variables” line, then click the gray “…” button that appears next to (Collection) on the right-hand side of the line. This opens the EnvironmentVariables Collection Editor dialog.
In the EnvironmentVariables Collection Editor dialog, click “Add”
In the “Name properties” section on the right, click the input box to the right of “Name,” remove the “Name” text that is already in the input box, and enter
DJANGO_SETTINGS_MODULE(note that this MUST be entered in ALL CAPS)Click the input box to the right of “Value” and enter donor_mgmt_system.settings
Click “Add” again and enter the following: Name:
PYTHONPATHValue:C:\apps\donor_mgmt_systemClick “Add” again and enter the following: Name:
WSGI_HANDLERValue:django.core.wsgi.get_wsgi_application()At this point you will have three environment variables: NOTE: All of these settings are CASE-SENSITIVE. They must be entered with exactly the case indicated here in order to work.
Click “OK” to close the EnviromentVariables Collection Editor
Click “OK” to close the Add FastCGI Application dialog
2. Create and Configure a New IIS Web Site
Next we need to create a new web site in IIS for the Django application, and add a Handler Mapping to the newly created web site so that requests coming to the IIS web site are passed off to the Django application for processing.
Open IIS Manager
On the left-hand side under Connections, expand the tree under the server name by clicking on the arrow to the left of the server name
Right-click on the Sites folder and click “Add Website …”
For the site name enter foo
For the physical path, type the following: C:\apps\foo
For the purposes of this example configuration, change the Port to 81, since the Default site is running on port 80. For a real-world application you’ll likely want to use name-based virtual hosting by adding bindings and run the site on port 80.
You may leave the “Host name” blank. At this point the Add Website dialog should look like this:
Click “OK”
3. Add a FastCGI handler mapping to this site
Add a FastCGI handler mapping to this site so the requests coming into the site will be processed by the Django application.
In IIS Manager, expand the Sites folder on the left-hand side and click on the foo site
On the right, double-click “Handler Mappings”
On the right, under “Actions,” click “Add Module Mapping”
In the “Request path” box enter an asterisk: *
Click the arrow on the right-hand side of the “Module” box and select “FastCgi Module” NOTE: Make sure to select FastCgi Module, NOT CgiModule
In the “Executable” box, enter the following: C:\virtualenvs\foo\Scripts\python.exe|C:\virtualenvs\foo\Lib\site-packages\wfastcgi.py Note that the character after python.exe is a pipe (|), which is entered by pressing Shift-\ on your keyboard
In the “Name” box, enter Django Handler (you can call this whatever you want; it’s merely a friendly name for the module mapping)
The Add Module Mapping dialog should now look like this:
Click the “Request Restrictions” button and uncheck the “Invoke handler only if request is mapped to:” checkbox.
Click “OK” to close the Request Restrictions dialog.
Click “OK” to close the Add Module Mapping dialog.
When prompted “Do you want to create a FastCGI application for this executable?” click “No” since we created the application earlier. Note that you CAN have it create the FastCGI application for you from the module mapping, but the settings seem to be different and the end result isn’t fully editable. I also detailed how to create the FastCGI application to be as thorough as possible with all the various pieces involved.
You will now see the Django Handler listed in the Handler Mappings for the foo website:
4. Configure Django and IIS to Serve Static Files
Now we have things more or less working but we aren’t quite done.
If you visit http://localhost:81/admin via a browser, you’ll see something like this:
The reason things look a little strange is because IIS doesn’t know where things like the CSS and image files for the Django application are located. We need to perform a couple of steps for IIS to be able to serve these files.
This isn’t an issue during development since Django has a static file server built into it, which can even serve static files if they are spread over various locations in code. But in production we need a comprehensive Webserver like Apache/IIS/Gunicorn to handle serving these files.
How Django handles static files is a bit of a topic in and of itself, so for further information please consult the Django documentation (https://docs.djangoproject.com/en/2.0/howto/static-files/). In this guide we’ll focus on a specific set of steps to get things working without getting into too many behind-the-scene technical details, the different philosophies on where static files can or should be placed, or the various and sundry ways in which this aspect of Django applications can be addressed.
For complete information about Django’s handling of static files, and production deployment of static files, please refer to the following section of the Django documentation:
https://docs.djangoproject.com/en/2.0/howto/static-files/
https://docs.djangoproject.com/en/2.0/howto/static-files/deployment/
A) CONFIGURE DJANGO’S SETTINGS.PY FILE TO TELL IT WHERE TO PUT THE STATIC FILES
First, your Django application’s settings file needs to include a STATIC_ROOT setting, and this setting is not in Django applications by default.
This STATIC_ROOT setting is used when Django’s collectstatic management command is run to determine where to place the collected static files.
In our sample foo application, we’ll tell Django to collect the static files in a static directory located in the same directory as the settings.py file. (You can ultimately put your static directory wherever you wish, but this is where we’ll be putting it for the purposes of this example.)
To accomplish this, do the following:
Using a plain text editor such as Notepad, or Idle if that was installed when you installed Python, open the file
C:\apps\foo\foo\settings.pyScroll to the bottom of the file, or use the find feature of your text editor, and find the
STATIC_URLsettingAbove the
STATIC_URLsetting, add the following setting:STATIC_ROOT = os.path.abspath(os.path.join(BASE_DIR, 'foo', 'static'))The placement of the
STATIC_ROOTsetting in the settings.py file doesn’t matter, but putting it right next to the STATIC_URL setting is typical and keeps all the settings related to static files in one place.The
STATIC_ROOTsetting we’re using as our example will put the static files inC:\apps\foo\foo\static
b) Run the collectstatic command
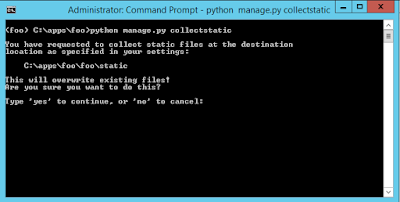
Now that Django knows where to put the static files, we can run the collectstatic management command. This command takes all the static files for your project, including the static files used by the Django admin and other packages in your virtual environment, and puts them under one static directory, the location of which is the STATIC_ROOT setting we added above, so they can be served by the web server.
Type yes at the prompt where Django asks you to confirm copying the the files into the STATIC_ROOT directory.
The static files will then be copied to the directory indicated by the STATIC_ROOT setting.
C) Add A static virtual directory to THE IIS web site
static virtual directory to THE IIS web siteNow we have all our static files in one place, but we still haven’t told IIS where they’re located. We’ll accomplish this by adding a static virtual directory to the IIS web site for our application.Note that the name of the virtual directory in IIS must match the value of the STATIC_URL setting in the Django application’s settings.py file, absent the beginning and trailing slashes. For our sample application we’re using a value of /static/ for the STATIC_URL setting, so the name of the virtual directory in IIS will be static.Create a virtual directory in IIS as follows:Open IIS ManagerOn the left-hand side under “Connections,” expand the server’s tree Expand the “Sites” folder Expand the foo web site. At this point, things should look like this: Right-click the foo web site and click “Add Virtual Directory” In the Add Virtual Directory dialog, enter the following values: Alias: static Physical path: C:\apps\foo\foo\static
Click “OK.” You’ll see the static virtual directory appear under the web site.
D) Configure Handler Mappings in IIS for the static Virtual Directory
static Virtual DirectoryThe last step is to tell IIS which handler to use to serve files out of the static virtual directory. Since at this point our Django Handler is set to serve all files for our application, even with the static virtual directory in place the Django Handler will still be attempting to serve these files.
IIS already has a static file handler active in the web site, but it’s down further in the list of handlers than the global Django Handler we configured, so to get IIS to serve the static files under the static virtual directory we’ll move the static file handler to the top of the handler list on the static virtual directory.
Open IIS ManagerExpand the server treeExpand the foo web siteClick on the
staticvirtual directoryDouble-click the “Handler Mappings” icon. You’ll see the following list of handler mappings: On the right-hand side under “Actions” click on “View Ordered List …” You’ll now see a list of the handler mappings in the order in which they’re run, with the Django Handler at the top. Click on the StaticFile handler at the bottom of the list, then click “Move Up” under “Actions” on the right-hand side. Note at this point you may receive a warning that by moving handlers you are detaching this virtual directory from the inheritance of the parent’s handler mappings. This is what we want to do, so if you get this warning click “Yes”.Continue to click “Move Up” until the StaticFile handler is at the top of the list of Handler Mappings.
With the StaticFile handler at the top of the list of Handler Mappings, requests that come into the static directory will be handled by the StaticFile handler as opposed to being processed by the Django Handler, so IIS will serve the static files now.Confirm that everything is working by going to http://localhost:81/admin in a browser. You should now see the CSS being applied to the page.
At this point your Django application should be playing nicely with IIS. You can now login with the password you configured during the initial Django setup i.e. when using manage.py createsuperuser or manage.py migrate etc. at the start.If you’re only able to access Django on the local system you might need to open the required ports on the Firewall.
Last updated