Configure Catch all Mailbox in Microsoft 365Page
Configure Catch all Mailbox in Microsoft 365
The catch all mailbox is a special mailbox that receives all the email messages that were sent to non-existing organization recipients. A catch all mailbox is an excellent solution to find out which messages are sent to your organization but were not received by the recipients. In this article, you will learn to configure catch all mailbox in the Exchange admin center (EAC).
Table of contents
Catch all mailbox in Exchange Online
The catch all mailbox in your Exchange Online server can benefit your organization. A catch-all mailbox collects any emails addressed to non-existent email addresses within the domain instead of bouncing them back to the sender as undeliverable. The catch-all mailbox routes any email sent to a non-existent or misspelled email address within the domain. This feature is particularly useful in preventing the loss of legitimate emails due to typos or misconfiguration.
An excellent way to understand the catch all mailbox is with an example outlined below.
Let’s say that the manager of our HR department has the following email address Amanda.Hansen@m365info.com. If someone sends an email message to this address Amanda.Heinz@m365info.com, the mail server (Exchange Online) will reject this message. The mail server will reply with a non-delivery report (NDR) to notify the source sender that there is no such recipient and that it could not deliver the message.
Microsoft sends a How to Fix It template in the NDR message.

To avoid the above scenario, you can configure the catch all mailbox that will accept all these email messages.
The Exchange administrator or another organization user will have access permission to that specific catch all mailbox. From time to time, they can look into the catch all mailbox and check for legitimate mail that was supposed to be sent to a specific recipient organization.
Catch all mailbox risks
The catch all mailbox is not a supported solution by Microsoft 365. Therefore, Microsoft has not published formal information about the catch all mailbox feature. It’s to avoid the fact that the catch all mailbox can increase spam emails in Microsoft 365 mail server.
Note: Exchange Online does not have the catch-all mailbox feature enabled by default.
Note: It’s important to understand that the catch all mailbox can’t be used or implemented in an Exchange Hybrid environment. But only on a “cloud only” environment, meaning the organization’s mail infrastructure is hosted only by Exchange Online, and no other mail infrastructure is involved.
Authoritative vs. Internal Relay domain
Before we go through the steps, let’s explain why you must change the domain default settings from Authoritative to Internal Relay.
When we register our public domain name in Microsoft 365, it’s considered an accepted domain. For this accepted domain, you can choose between two different authorities:
Authoritative: Email is delivered only to valid recipients in this Exchange organization. All email for unknown recipients is rejected.
Internal Relay: Email is delivered to recipients in this Exchange organization or relayed to an email server at another physical or logical location.
By default, the accepted domain is set to Authoritative. It means that the Exchange Online server has the authority of this accepted domain.
When someone sends an email from a registered public domain to a recipient’s email address, the Exchange Online server will first look into the Global Address List (GAL). Exchange automatically creates this built-in list and includes every mail-enabled object in the Active Directory.
Note: If the recipient’s email address does not appear in the GAL, the Exchange Online server will reply with an NDR message. It will inform the source sender that the recipient does not exist.
Internal Relay
To share the authority with the Exchange Online server and another mail server, you must configure Internal Relay for your accepted domain.
If someone sends an email from a registered public domain to a recipient’s email address, the Exchange Online server will go through the recipient list (GAL).
Note: If the recipient’s email address does not appear in the GAL, the Exchange Online server will forward the mail to the other mail server.
Transport rule
Each time Exchange Online gets a request for delivering an email message to a non-existing Exchange Online recipient, it will look for the other mail infrastructure MX records by default.
To change this behavior, we must set up a transport rule in Exchange Online that will enforce Exchange Online to deliver the email message to the designated catch all mailbox.
How to configure catch all mailbox in Exchange Online
To configure the catch all mailbox in Exchange admin center (EAC), we need to follow these steps:
Create a shared mailbox to catch all mailbox
Create a dynamic distribution group
Change accepted domain from Authoritative to Internal Relay
Create an Exchange Online transport rule
Step 1. Create shared mailbox
The first step is to create a shared mailbox to use as the catch all mailbox. It is better to receive the non-existing emails of your domain in one mailbox.
We recommend creating a shared mailbox because of the following reasons:
There are no licenses required
Share with other members
Assign Send as or Full Access permissions
If you already have a shared mailbox you want to use as the catch all mailbox, then you can skip this step.
Create a shared mailbox in Exchange admin center:
Sign in to Exchange admin center
Click Recipients > Mailboxes
Click Add a shared mailbox
Type Display name Catch All
Type Email address Catch.All
Select Domain m365info.com
Click Create

Note: You will get a notification saying the shared mailbox was created. It may take a few minutes before you can add members. Close the pane.
Add members and assign permissions to the created shared mailbox:
Click on the created shared mailbox (Catch All) from the list
Select Delegation
Go to Read and manage (Full Access) > Click Edit

Click Add members

Select users
Click Save

Click Confirm
Close the pane
A notification will show that the mailbox permissions and selected users were added successfully. The changes are saved and will appear within minutes.

If you want to add Send as permission to users in the shared mailbox, you can follow the steps shown above.
Step 2. Create dynamic distribution group
The next step is to create a dynamic distribution group including all the existing organization recipients. This is to let the catch all mailbox understand which email addresses already exist within the organization domain.
Create a dynamic distribution group in EAC:
Sign in to Exchange admin center
Click Recipients > Groups
Click Add a group
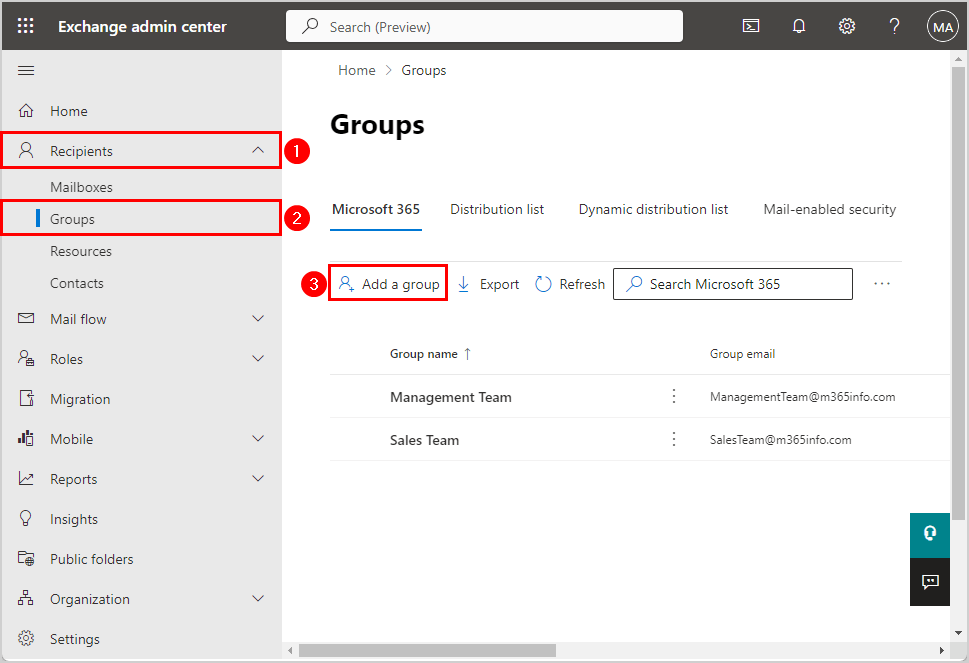
Choose a group type.
Select Dynamic distribution
Click Next

Set up the basics.
Fill in the Name, e.g., All Microsoft 365 recipients
Click Next

Assign users.
Select All recipient types
Click Next

Edit settings.
Type the email address
Select the domain
Click Next

Review and finish adding the group.
Click Create group

The group All Microsoft 365 recipients is created, but it isn’t ready to use yet.
Click Close

Note: It might take up to two hours to prepare the group for use.
Step 3. Convert domain to Internal Relay
Convert the accepted domain default settings from Authoritative to Internal Relay by following the steps below.
Go to the Exchange admin center
Click Mail flow > Accepted domains
Click on the default domain

The accepted domain (m365info.com) pane opens.
Select Internal Relay
Select Allow mail to be sent from this domain
Click Save

You can see that the accepted default domain type has changed to Internal Relay.
Note: An organization with multiple public domain names in Microsoft 365 will need to change the default settings from Authoritative to Internal Relay to each of the domains separately.

To configure the catch all mailbox, we need to create a new rule in the next step.
Step 4. Create mail flow transport rule
Time needed: 15 minutes
Create a new transport rule in Exchange admin center.
Set rule conditions
Type the name Catch all rule

Apply this rule if
Select > The sender Select > is external/internal

Select sender location
Select > Outside the organization Click Save

Do the following
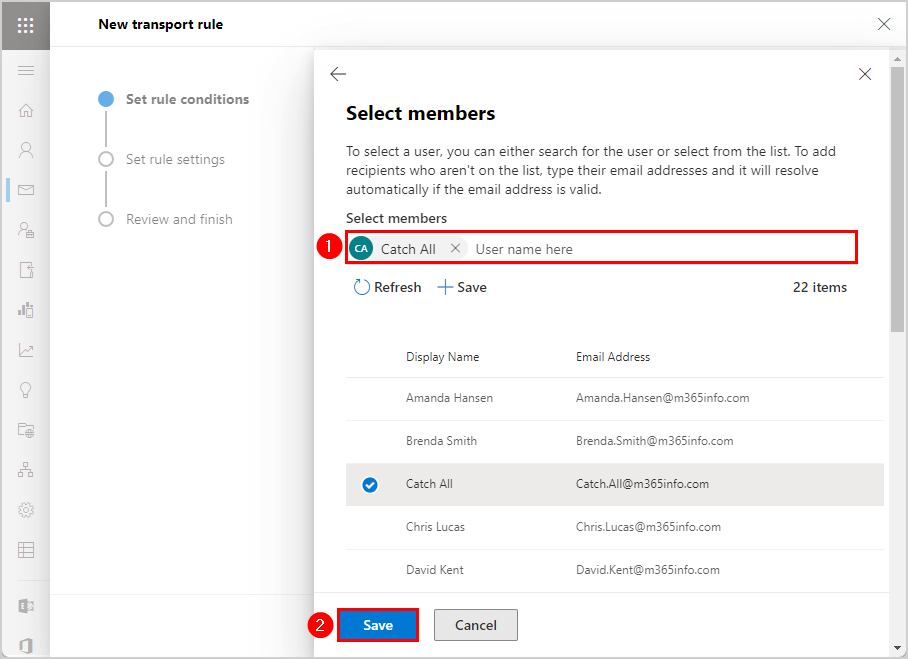
Select > Redirect the message to Select > these recipients

Select members
Search and select the created shared mailbox from the list Click Save
Except if
Select > The recipient Select > is a member of this group

Select members
Select the created dynamic distribution group > All Microsoft 365 recipients Click Save

Name and set conditions for your transport rule results
Click Next

Set rule settings
Leave the default settings & click Next

Review and finish
Click Finish

Transport rule created successfully
Click Done to close the pane


The transport rule is disabled by default. Therefore you must go to the Catch all rule you created. Select the new rule and set the toggle to Enabled. Wait a few minutes to update the changes.

You did configure the catch all mailbox rule, but we need to check if the catch all mailbox configuration works in the next step.
Verify catch all mailbox configuration
Email a non-existing recipient from the internal domain m365info.com.
Important: Give it 15 minutes before you test the Catch all mailbox rule, as it needs time to propagate in the Exchange Online environment.
In our example, we will use Amanda’s (Amanda.Morgan@m365info.com) to send an email message to the following email address: Unknown456@m365info.com.

You can see the email Amanda sent to the non-existing recipient Unknown456@m365info.com, but it was redirected and delivered to the Catch All shared mailbox.
When we open the folder Catch All > Inbox, we see the email message was delivered. Even though the email address did not belong to anyone from the recipient list (GAL), the email message was sent with the help of the mail flow transport rule.

The table below shows where your email will be received if an internal (organization domain) or external (Hotmail, Gmail, or other domain) email address sends it.
From
To
Receive
Internal
Existing email address
Existing recipient
Internal
Non-existing email address
Catch all shared mailbox
External
Existing email address
Existing recipient
External
Non-existing email address
Catch all shared mailbox
You did successfully configure the catch all mailbox rule in Exchange admin center!
Conclusion
You learned how to configure a catch all mailbox for your organization in Exchange admin center. It solves the problem of missing important emails because of spelling errors. Remember that this is not a solution for every organization, as it can cause an increase in spam emails. But it’s an excellent way to control every message sent to the organization that didn’t reach the recipient’s mailbox.
REFERENCES
Last updated