SYSTEM ADMIN BOOK
  • Hardware/Physical Machines
    • Physical Networking
      • Patch Panel
    • Hardware Devices
    • PC Build
    • RAID Configs
  • System Configuration
    • Windows
      • OneDrive for Business, Map as Network Drive in Windows
      • PDF Printer
      • Reset Windows Password
    • Linux
    • Mac
      • Factory Reset Mac Mini
      • Install FortiClient VPN
      • Remove FortiClient VPN for Macs
      • Setting Microsoft Teams Notifications in MacOS
      • Download and Install Whatsapp
  • Windows Server
    • Troubleshooting
      • 100% Disk Usage Issue
      • Maximum Path Length Limitation
    • Basic Configurations
      • Change Hostname
      • Change Default RDP Port
      • Create a User
      • Add user to Administrator group
      • Add user to Remote Desktop Users group
      • Allow log on locally - security policy setting
      • Allow Multiple Remote Desktop Connections
      • Enable Insure Guest Authentication
      • Shrink Partition
      • Extend Partition
    • FTP Server
      • Install FTP Server (IIS)
      • Create User Group
      • Add FTP Site (IIS)
      • User Isolation
      • Allow Firewall
      • FTP Client (FileZilla)
      • FTP Server (FileZilla)
      • Configure Passive Mode in FileZilla Server
      • Configuring Windows Firewall for FileZilla Server
      • FileZilla: Password reset
      • Generate a New Self-Signed Certificate
    • Group Policy
      • Block Access to the Control Panel for All Users
      • Create a Logon Banner (Legal Notice)
      • Enable / Disable Copy-Paste Policy
      • Disable Shutdown, Restart Options
      • Disable Multiple Session for Single User
      • Disable Automatic Lock Screen in Windows Server
    • Services
      • NSSM - the Non-Sucking Service Manager
      • Node-windows Library
    • Task Scheduler
      • Automate Program Execution
      • Restart Windows Server Daily
    • Auditing and Diagnostincs
      • Enabling the System Event Audit Log
      • Audit RDP Port Change Event
      • Check the read/write speed of your hard drive
      • Clear temp file and .trc file
    • Event Viewer
      • Restart / Shutdown Event
    • Active Directory
  • Control Panels
    • Plesk
      • Set Hard Quota on disk space for subscription(s)
      • Changing MX, A, and CNAME Records
      • Host Node.js Application
      • Add FTP account
      • Remove FTP account
      • Download a folder using Plesk File Manager
      • Install WordPress on domain using WP Toolkit
      • Change the name of a Subscription system user
      • Exporting and Importing Database Dumps
    • OVI Panel
      • DNS Zone Editor
    • SolidCP
      • Add a MS SQL database in SolidCP
    • cPanel
  • Virtualization
    • Proxmox VE
      • Introduction
      • Download Proxmox ISO
      • Prepare Installation Media
      • Launch Proxmox Installer
      • Create a VM
  • Web Servers
    • IIS
      • Install IIS
      • Configure Default Site
      • Application Pool
      • Installing PHP
      • Deploy a PHP Application
      • Deploying a Laravel app on Windows using IIS
      • Update PHP Version in IIS
      • Host a Node.js /w Next.js Application
    • JBoss
  • VPNs and Proxy Servers
    • Reverse Proxy
      • IIS - Node.js Application
  • Database Servers
    • MS SQL
      • Download and Install
      • Install SSMS
      • Uninstall an Instance of SQL Server
      • Enable SA Account
      • Change SA Account Password
      • Enable Network Access to SQL Express
      • Create and configure a user in MSSQL
      • Clear SQL Server Cache
      • Setting Infinite Timeout in SQL Server Contexts
      • Take SQL Server Database Offline
      • Memory configuration
    • MySQL
      • Install and Configure MySQL
  • Web Dev Stacks
    • MERN (w/ Next)
      • Build and Run Node.js Project with Next.js
  • IT Ticketing Systems
    • Jira Ticketing System
  • Linux Servers
  • AWS Environment
  • Azure Environment
  • Backup and Security
    • SSL Certificates
      • Types of SSL Certificates
      • IIS 10: Create CSR and Install SSL Certificate
      • IIS 7: Generate CSR for Wildcard SSL
      • IIS: Generate CSR for Multi-Domain SSL
      • OpenSSL: Generate CSR
      • IIS 10: How to Install and Configure Your SSL Certificate on Windows Server
      • IIS: Export Pfx using MMC
      • IIS: Import Pfx using MMC
      • IIS: Export Pfx using IIS Manager
      • IIS: Import Pfx using IIS Manager
      • cPanel: Export PFX
      • Godaddy-CPanel: Generate a CSR
      • Godaddy-CPanel: Install SSL Certificate
      • cPanel: Generate CSR
      • cPanel: Install SSL Certificate
      • cPanel: Install Let's Encrypt SSL
      • Plesk: Generate CSR
      • Plesk: Let's Encrypt SSL Installation
      • Plesk: Installing the SSL certificate
      • Plesk: Export Public & Private Key
      • Win-ACME Let's Encrypt SSL
      • Certbot - Install SSL
      • Export Leaf, Root, and Intermediate Files
      • XAMPP - Let's Encrypt SSL Installation
      • JBoss Web Server: CSR Generation
      • JBoss: Install SSL Certificate
    • Backup
      • Database
        • MS SQL DB Backup
        • MS SQL Restore Backup
    • Microsoft Defender for Endpoint
      • Introduction & Licenses
    • Microsoft Intune - Endpoint Management
      • Product Introduction
      • Intune Policies for MacOS
      • Enroll your macOS device using the Company Portal app
    • Vulnerability Scanning
      • OpenVAS Quick Guide
      • Nessus Quick Guide
    • Acronis
      • Download and Install the Acronis Cyber Protection Agent
      • Performing a file-level backup
      • Creating a disk-level backup
      • Performing a file-level recovery
      • Enabling Active Protection and Vulnerability Assessment
  • Email and Office 365
    • Troubleshooting
      • Run a message trace in the Exchange admin center
      • Not receiving email
      • Office 365 Apps Activation Error
      • Gmail Issue: Clearing Cache and Cookies
      • Excel worksheet, right click insert not functioning
      • Microsoft 365 Apps activation error: “Your organization has disabled this device”
    • Hybrid Mail Setup
      • Set Up Connectors Between Microsoft 365 and SmarterMail
    • Email Authentication
      • Protocols
    • Mail Clients
      • Outlook
        • Maximum number of Exchange accounts in an Outlook profile
        • Enable automatic forwarding in new Outlook
        • Add Email Signature
        • Create Email Singature
        • Gmail Account Login in Outlook
        • Enable desktop notifications for Outlook on the Web (OWA) in Windows
        • Move Mails to Specific Folders
      • Apple Mail
        • Add email accounts in Mail on Mac
        • Add Mail Signatures
      • Gmail
        • Mail Forwarding to Another Account
        • Set Up an Auto-Reply (Vacation Responder) in Gmail
    • Office 365
      • Intro & Subscriptions
      • How to Create a Trial Account
      • How to Access the Office 365 Admin Center
      • Creating a Tenant
      • Create Users
      • Add several users at the same time to Microsoft 365
      • Creating & Managing Roles
      • Add a Domain
      • Manage MFA
      • Let users reset their own passwords
      • Assign Global Admin Roles
      • Create APP Password
      • Change a user name and email address
      • Reset MFA for Microsoft 365 User
      • Configure email forwarding
      • Add email aliases to a user
      • Change Username or Email Address
      • Export Mailbox to PST From Office 365
      • Import PST to Exchange Online (Microsoft O365)
      • Enable archive mailboxes for Microsoft 365
      • Grant Export Permission in M365 Compliance Center
      • Generate Transfer Token
    • Google Workspace
      • Intro & Plans
      • Create your Google Workspace trial account
      • Review your DNS records
      • Adding Users
      • Create organizational units
      • Restrict access to a Google Workspace service
      • Edit user attributes
      • Manage user accounts
      • Suspend a User
      • Generate a Transfer Token
      • Reduce Licenses in Google Workspace
      • Auto-forward From Google Workspace Using Routing
      • Recovering administrator access to your account
    • MailEnable
    • SmarterMail
      • SmarterMail Installation
      • SmarterMail Server Setup
      • Installation and Configuration (Practical)
      • Enable / Disable Domain in SmarterMail
      • Enable / Disable MFA for User Accounts
      • Create an Administrator User in SmarterMail
    • Microsoft Teams
      • Guest Access vs. External Access
      • Adding Guests To Microsoft Teams Team
      • Teams Chat DIfferent Domain: Enable External Access
      • Setup Teams Time Zone and Work Hours
      • Add Contact Numbers in Profile Page
    • Microsoft Defender for Office 365
      • Remove blocked users from the Restricted entities page
    • Microsoft Purview
      • Create a Retention Policy for Archiving in M365
  • DevOps
  • Firewalls and Access Points
    • Windows Firewall
      • Allow Ports on Windows Firewall
    • Sophos Firewall
      • Set up a new firewall with Sophos Central
      • Enable Sophos Central management of Sophos Firewall
  • Networking
    • Troubleshooting
    • Cisco Router Config
    • Cisco Switch Config
      • Basic Data and Voice VLAN Setup Homelab
  • Migration
    • Drive Migration
      • Google Drive to One Drive
      • One Drive to One Drive [SharePoint Migration Tool]
      • Migrate Google files to Microsoft 365 for business
    • Mail Migration
      • Google Workspace to Office 365 (Manual Method)
      • Google Workspace to Office 365 (Automatic Method)
      • IMAP to Office 365
      • Migration Using PST File Method
      • Office 365 to Google Workspace Migration
      • G-Suite to G-Suite Migration
    • VM Migration
    • Website Migration
      • Migrating IIS Sites Using Web Deploy
      • Plesk to Plesk Migration
    • Database Migration
  • Monitoring
    • Prometheus
      • Monitoring Windows Servers Using Prometheus
    • Grafana
      • Visualize Data in Grafana
    • Loki
  • Data Center
    • HPE ProLiant ILO Configuration
  • Other Technologies
    • Some R&Ds
      • Active vs. Passive Mode in FTP
      • IIS Recycling and Virtual Memory Limit
      • IIS Application Pool
Powered by GitBook
On this page

Was this helpful?

  1. Control Panels
  2. OVI Panel

DNS Zone Editor

DNS Zone Editor

OVIPanel provides a simple and powerful module named DNS Zone Editor using which you can configure DNS records for your domain. DNS will maintain a directory of domain names and translates it to IP address. This is helpful because domain names are very easy to remember and can be accessed very easily. It helps a lot for the web owners to change their web hosts without changing their domain names, instead change the DNS entry of domain name and point them to the new web host’s name servers.

DNS Zone Editor Consists of A, AAAA, CNAME, MX, TXT, SRF, SPF, NS Records. In this page, we will discuss in detail regarding the records, its purpose, and its syntax.

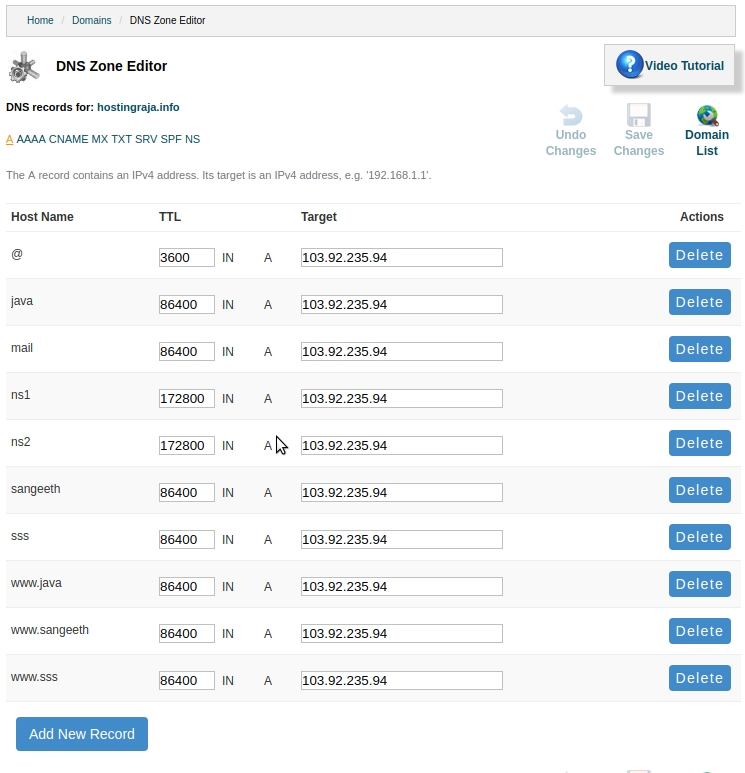
A Record: It commonly known as address record, It is used to map your domain name to the IP address means it will find the IP address of a computer connected to the internet from a name. For example: Whenever you send request from your browser to the website i.e hostingraja.in, will get re-directed to the server with IP address 182.18.188.139. You can use dig command on the terminal to determine the A record associated with a domain name. The result is contained in the ANSWER section and it contains the fully-qualified domain name (FQDN), the remaining time-to-live (TTL) and the IP address. A Record maps a hostname to a 32-bit IPv4 address.

Example of A Record with Syntax:

hostingraja.in IN A 182.18.188.139

Where

hostingraja.in: is the domain name

IN: indicates Internet

A: indicates the Address record.

The above example indicates that the IP Address for the domain hostingraja.in is 182.18.188.139

You can use ping and dig check your IP address which is associated with your domain name.

AAAA Record: An AAAA record or IPv6 address record maps a hostname to a 128-bit IPv6 address. It indicates that the IPv6 address is four times the size of the IPv4 address.

Example of AAAA Record with Syntax:

linux aaaa 3ffe:1900:4545:2:02d0:09ff:fef7:6d2c

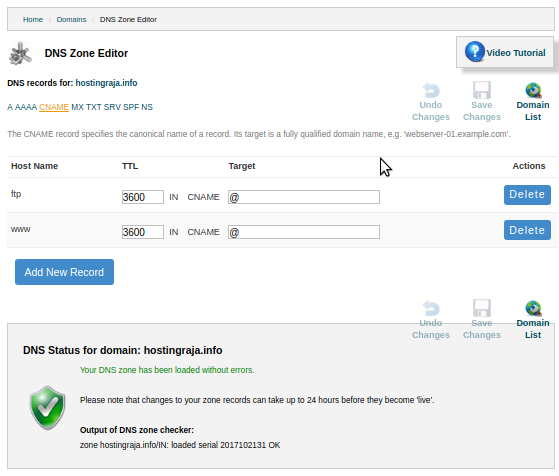
CNAME Record: A CNAME record makes one domain name as an alias of another domain name. The aliased domain name gets all the subdomains and DNS records of the original. We can make use of CNAME record whenever we want to associate a new subdomain to an already existing A record i.e. we can make "www.hostingraja.in" to "hostingraja.in", which should already have been assigned an IP with an A record. So that we can have many subdomains as per our requirement without having to specify the IP for every record. Use a CNAME if you have more services pointing to the same IP. This way you will have to update only one record in the convenience of a change of IP address.

Example Of CNAME With syntax:

mail.hostingraja.IN CNAME mail.hostingraja.info

MX Record: An MX record or mail exchange record sets the mail delivery destination for a domain or subdomain.MX Entries must point to a domain and never point directly to an IP address.

Example with MX Record Syntax:

hostingraja.info 86400 IN MX 10 mail.hostingraja.info

Where

Hostingraja.info: indicates hostname

86400: is TTL

IN: indicates Internet

MX: indicates Mail exchange record

10: is the priority

Mail.hostingraja.info: indicates the target

TXT Record: This record is used to implement the Sender Policy Framework specification. It is used by many email systems which will help to identify if the email is coming from a trusted source, helping filter out spam or messages pretending to be from your domain. It is commonly used to create an SPF record on nameservers, also used to create a DKIM record for mail signing.

Example of TXT Record with syntax :

  1. SPF Record:

hostingraja.info 3600 IN TXT v=spf1 a mx ptr a:103.92.235.94 mx:hostingraja.info ip4:103.92.235.94 ~all

  1. DKIM Record:

default_domainkey 3600 IN TXT v=DKIM1;k=rsa;p=MIGfMA0GCSqGSIb3DQEBAQUAA4GNADCBiQKBgQDUSPDLgfkKIR8EvIP3nCWZ0jK3C1JzTBBabcADE7bXziKGW0MgeGkiA7YMJzaaZ67CeO6B+kLTvNTbOYI0CxG3NPC9cS55FtCkxj6Iq/eHFRRQfgOphQuHssALD/xGa4ZJsNJlsZ/3CUktSv3eszFP1yLvRzAWdvsM6IId8FneOwIDAQAB

SRV Record: An SRV i.e Service record points one domain to another domain name using a specific destination port. SRV records allow specific services, such as VOIP or IM, to be directed to a separate location.

Example of SRV Record with the syntax:

_service._protocol.example.com SRV 10 0 5060 service.example.com

  1. Service: The name of the service must be preceded by an underscore (_) and followed by a period (.). The service could be something like _xmpp.

  2. Protocol: The name of the protocol must be proceeded by an underscore (_) and followed by a period (.). The protocol could be something like _tcp.

  3. Domain: The name of the domain that will receive the original traffic for this service.

  4. Priority: The first number (10 in the example above) allows you to set the priority for the target server. You can set different targets with different priorities, which allows you to have a fallback server (or servers) for that service. Lower numbers have a higher priority.

  5. Weight: If two records have the same priority, weight is used instead.

  6. Port: The TCP or UDP port on which the service runs.

  7. Target: The target domain or subdomain. This domain must have an A or AAAA record that resolves to an IP address.

NS Record: A name server translates domain names into IP addresses. This makes it possible for a user to access a website by typing in the domain name instead of the website's actual IP address. For example, when you type in "www.hostingraja.in" the request gets sent to the demo site's nameserver which returns the IP address of the hostingraja site website.

Each domain name must have at least two name servers listed when the domain is registered. These name servers are commonly named ns1.servername.com and ns2.servername.com, where "servername" is the name of the server. The first server listed is the primary server, while the second is used as a backup server if the first server is not responding. Once you update with the name server it takes around 48 hours to get into reflecting, usually it takes 3 to 4 hours because it takes time for each DNS server to update other servers around the world about the change you made. The main advantage of using this Name server is you can change name server whenever you want and if do not want your domain to our name server you will be not able to use our web and email systems to configure your domain name, nor will you be able to use our hosting solutions. To check your name server details you can go to https://intodns.com/ and enter your domain and submit.

Example of NS Record with the syntax:

hostingraja.info 172800 IN NS ns1.hostingraja.info

hostingraja.info 172800 IN NS ns2.hostingraja.info

Steps you need to follow to Configure DNS:

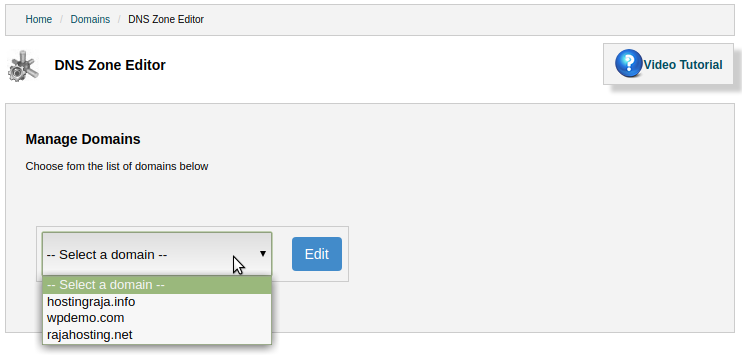
Step1: Select the domain name from the Drop-down and click on Edit.

Step2: Now you will be able to see DNS Types like A, AAAA, CNAME, MX, TXT, SRF, SPF, NS. Select appropriate type

Step 3: Click on Add New Record and fill the details and click on Save changes which are present in the top. Kindly follow the same steps for other DNS Types. The syntax of each type is mentioned in the above examples.

For adding CNAME >> select Cname >> enter the hostname, TTL and target and click on save

Step 4: After it is done log-in to root access in the command prompt and execute the following command

service named restart

Note:

>> Any DNS record which is been updated will take 24-48 hours to reflect globally

>>You can check, if the record is updated correctly using the website :


REFERENCES

  • https://www.ovipanel.in/tutorials/3-1/3646-dns-zone-editor

PreviousOVI PanelNextSolidCP

Last updated 1 month ago

Was this helpful?

For adding MX >> select hostname >> enter the hostname, TTL, priority, target and click on save.

For adding TXT record >> select TXT >> enter the hostname, TTL and Target and save changes

For adding NS record (nameserver record) >> select NS >> enter the nameserver details like hostname, TTL, target and click on save

MX Lookup Tool - Check your DNS MX Records online - MxToolboxMxToolbox
Logo